As a photographer, the matter of which tripod to use is a tough one. You want something small and compact, especially for travelling, but sometimes those designs end up compromising on quality, durability or sturdiness.
I bought a Peak Design aluminium tripod last year and although there are things I really love about it, I have been looking for something more lightweight ever since, so when Explorer Photo & Video reached out and asked if I wanted to try their EX-EXP Expedition Carbon Fibre Tripod, I was, of course, keen!
I’ve been using the Expedition tripod for a little over a month now and feel confident that I can give an honest review. Let’s start with the things I love about it:
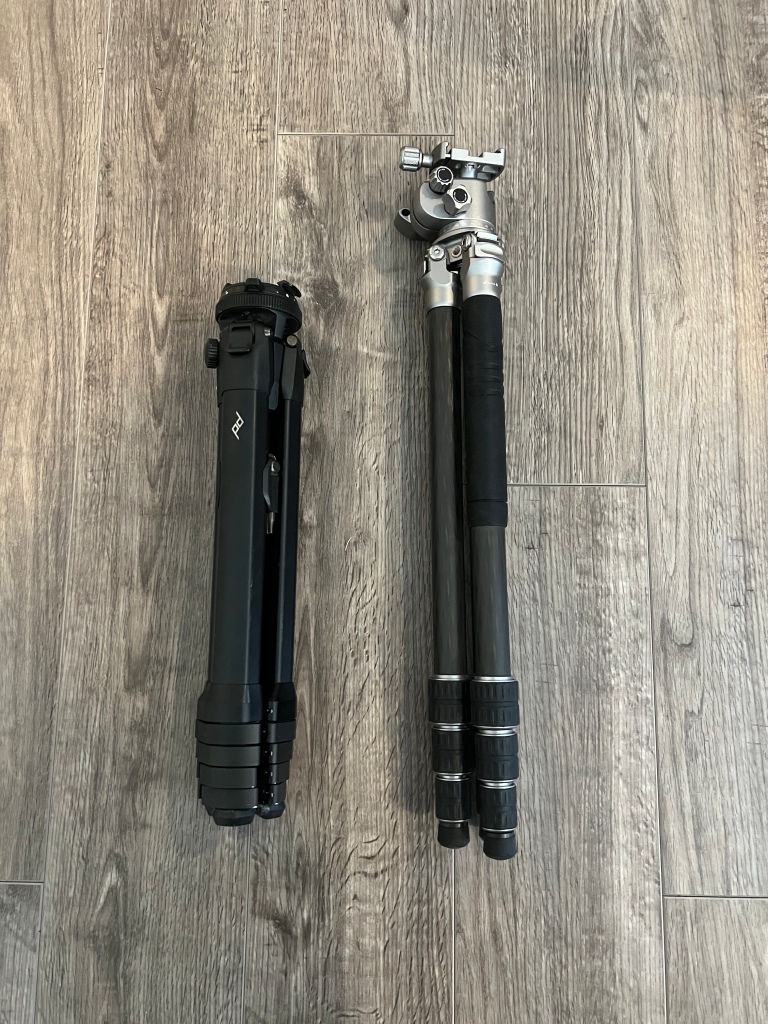
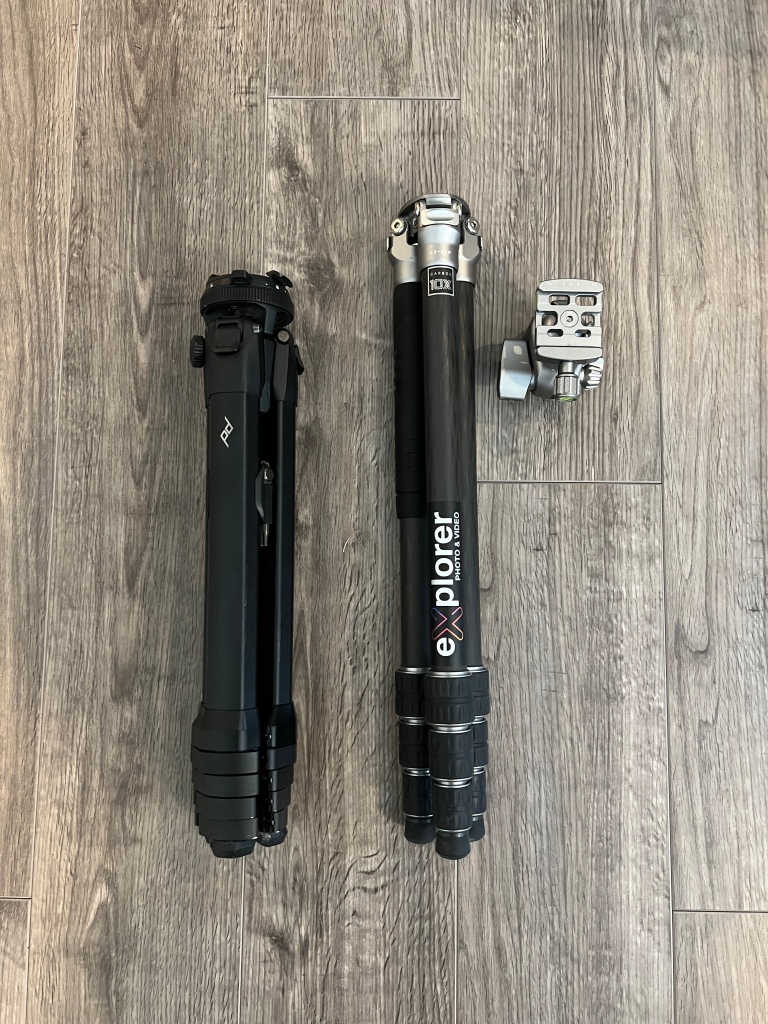
• WEIGHT: this tripod is super lightweight, and although it’s taller than my Peak Design (as seen below with and without ball head removed), the weight difference is huge and this is always an important consideration when backpacking and travelling a lot.
• REMOVABLE MONOPOD LEG: The Expedition Tripod comes with the option of removing a single leg for use as a monopod, which is useful if you want a little bit of stability without the hassle of setting the tripod up. This is definitely a cool feature that the Peak Design doesn’t have and something I found useful
The removable monopod leg
• OPTIONAL SPIKES: The Expedition Tripod also comes with pointy metal feet which you can unscrew and switch out with the rubber feet the tripod comes with. This is perfect for getting some extra grip in soft ground, like grass or earth. I mostly shoot on rocky terrain, so I love that the rubber feet had good traction and the tripod felt really secure.
• BALL HEAD: I’ll be honest, it took me a minute to get used to the dials on the ball head and figure out what each knob controlled, but once I did, I appreciated how easy it was to rotate the entire ball head to change up my comp, as well as how easily the ball head changed from portrait to landscape, something I find frustratingly complicated with my Peak Design.
I was also really pleased that my Peak Design plate was compatible with the ball head on the Expedition, because I use my Peak Design Capture Clip when I hike and it probably would have been game over for me if this didn’t work with the new tripod. Thankfully it did and I was able to easily switch from my Capture Clip to the tripod and my camera felt secure.
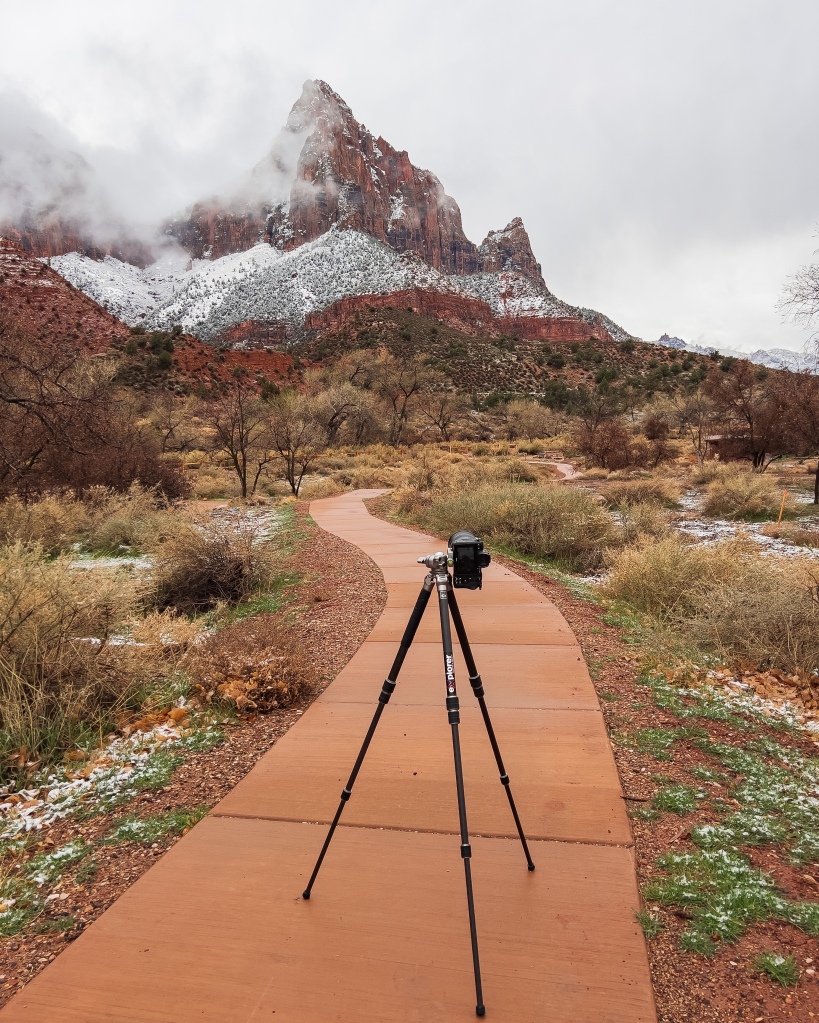
The Explorer EX-EXP tripod in action at Zion NP
MY OVERALL THOUGHTS:
In conclusion, I really love the tripod and for the price point ($389 at time of writing), it’s a worthy competitor for the aluminium Peak Design, which is one of the best compact travel tripods on the market right now.
If there was just one thing I could change, it would be the overall height with the ball head attached because it’s annoying that it won’t fit IN my current bag, but it’s really a very small gripe for a very good tripod.
If you’re interested in checking out the Explorer tripod, click the link below:
What are your main criteria when choosing a tripod? Are there some features you can’t live without? I’d love to hear if you have a tripod you love and what makes it your go-to choice.
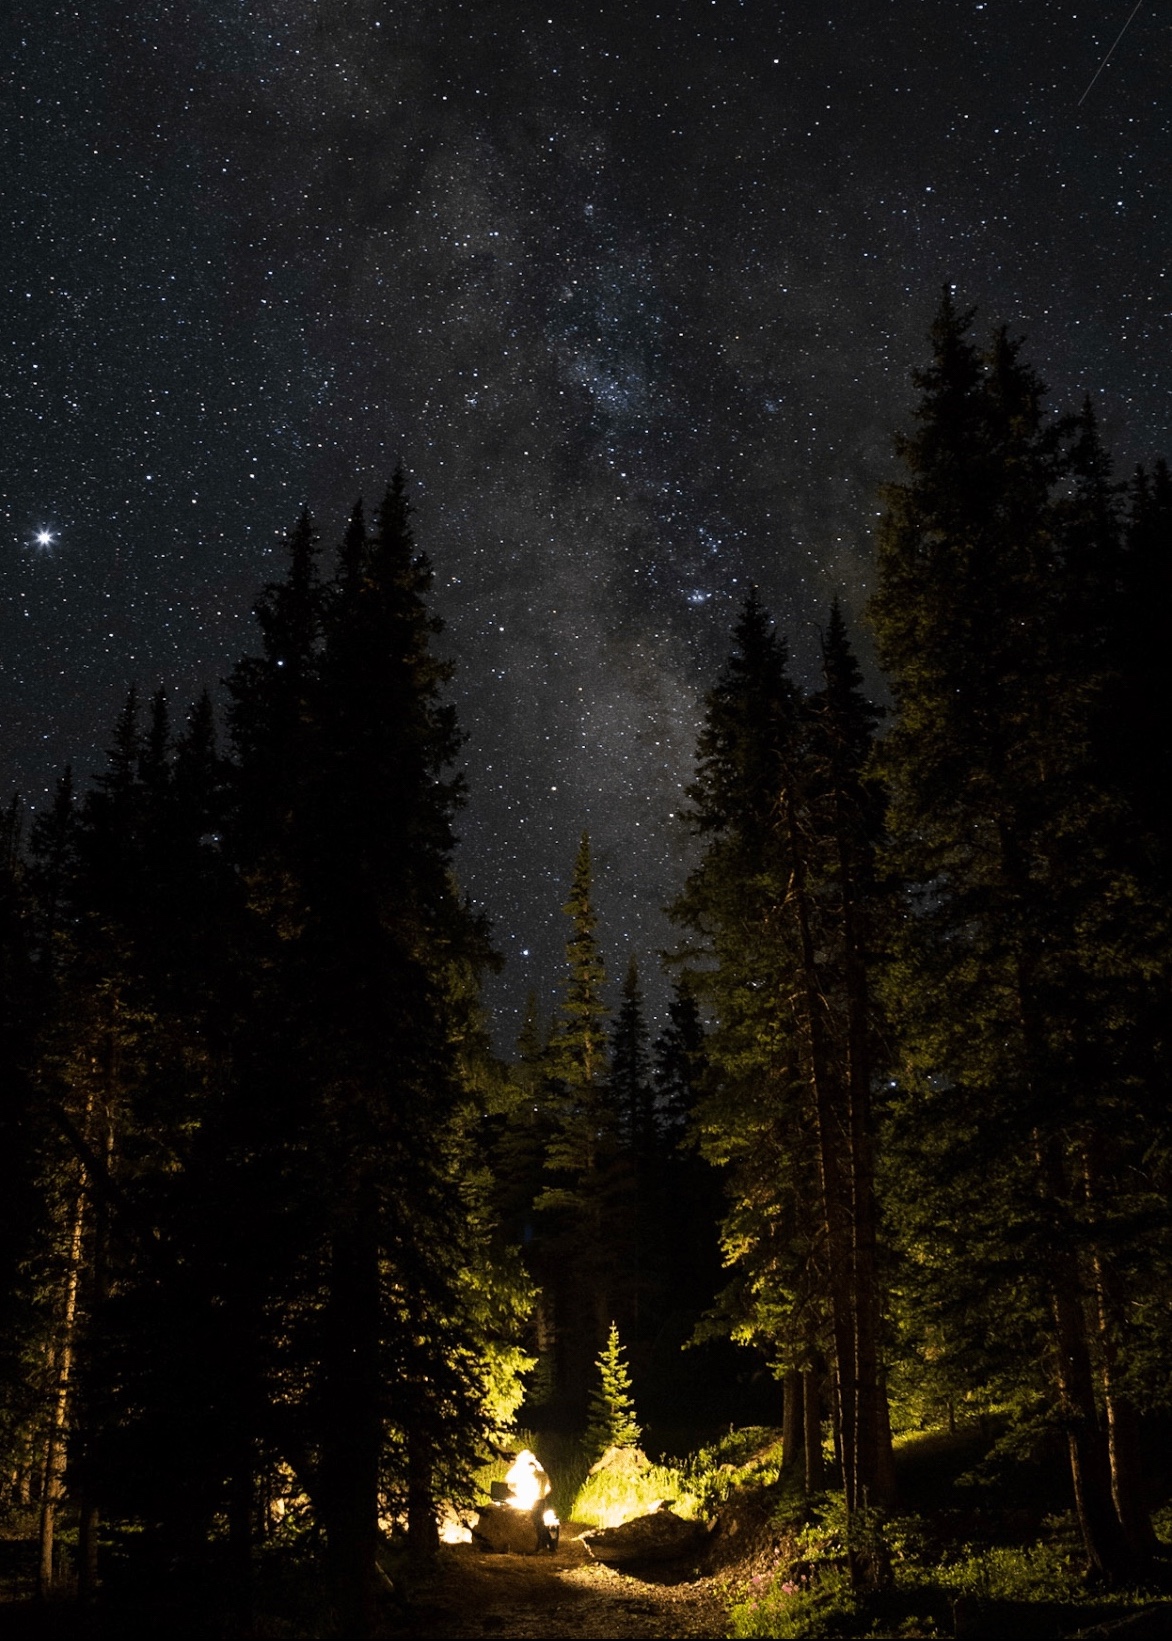
Have you ever seen pictures of the Milky Way over an epic landscape, and wondered why you can’t take photos like that yourself? Well you’re not alone, and you’re in the right place! Whether you’re wondering what equipment you will need, how to find the Milky Way at night, what settings to use or how to edit the photos you get, we’re going to cover it all! First of all though, it’s worth mentioning that the galactic core of the Milky Way (the bright cloudy part you see in all the photos) is only visible at certain parts of the year depending on where you are. In the Northern Hemisphere the galactic core is visible from around March – September.
Things to consider for Milky Way photography
There are a few things that you need to know before you go out to shoot the Milky Way, all of which we will discuss in more detail throughout the post.
Having a camera that has the right capabilities to shoot Milky Way
Finding somewhere dark with little to no light pollution, preferably on a night with a New Moon
How to get the Milky Way in focus
What settings you need to capture the Milky Way
How to edit Milky Way photos to bring out the details
What gear do I need?
Phones
First of all, with the way technology has improved these days, you actually don’t HAVE to have a camera any more to capture the Milky Way. Below is a list of all of the camera phones that have the low light capability to shoot the Milky Way.
Iphone 12
Google One+ One
Google Pixel 4
Huawei P40 Pro
Samsung Galaxy S20 Ultra 5G
Xiaomi Mi Note 10
Later on in the post I will go through the best settings for capturing the Milky Way.
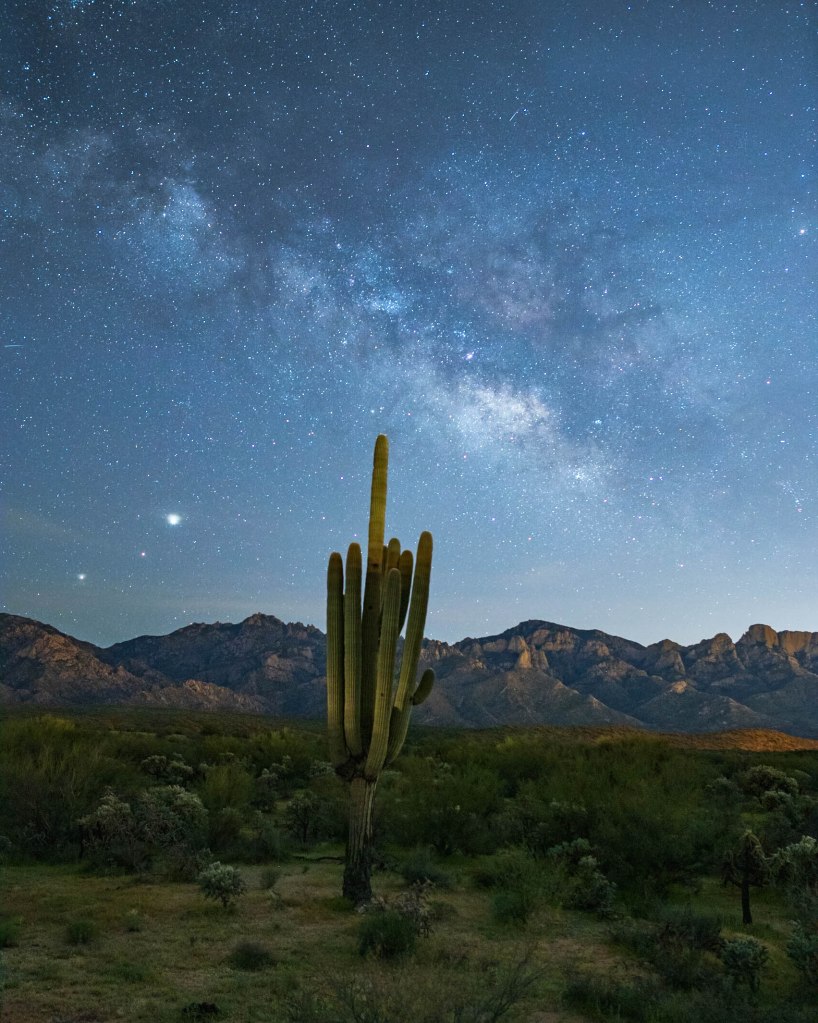
A Milky Way photo shot on my iPhone 12 Pro Max in April 2021
Camera Body
As far as cameras go, you will ideally want a camera that has manual setting capability and has changeable lenses, although this is not absolutely necessary. The Milky Way can be captured on both Crop sensor (APS-C) and Full Frame (FF) cameras, although FF is going to give you a much bigger area to capture, which is better for Milky Way landscapes. It is possible to shoot the Milky Way on some more advanced point and shoot cameras as well, as long as you can adjust the exposure length.
My recommendation when it comes to camera body would be to buy the best one you can afford, but remember that the lenses matter more than the body. I always recommend people spend their money on good quality lenses, mostly because these will last you throughout many bodies as technology improves and sensors gets better. My very first Milky Way photo was taken in 2018 on a D3400 with the 18-55mm kit lens!
The first Milky Way shot I ever took. From 2018, taken in a Nikon d3400 with the 18-55mm kit lens
Lenses
When it comes to the best lenses for Milky Way Photography, there is a common misconception that you have to have a specialized lens for astrophotography. Whilst ideally, you want to look for one with a low aperture (the f number on a lens) that will capture a lot of light, kit lenses (typically f4) are fully capable of capturing crisp Milky Way photos. The majority of cameras are sold with two kit lenses, a 24-70mm f4 and a 70-200mm f4.5-6.3, and for Milky Way landscapes you want to get as much of the landscape in as possible, so the 24-70mm all the way zoomed out at 24mm is going to be the ideal choice. If you are looking to buy an astro specific lens, I would recommend an ultra-wide angle such as the Rokinon/Samyang 14mm f2.8 or 24mm f1.4. (I use the 24mm f1.4 and love it, although I do find myself wanting something wider sometimes, in order to get the whole scene in [and more of the Milky Way Core] and will use my 14-30mm F4 with a tracker if necessary).
Tripod
A tripod is an absolute must for night photography as you will be using a long exposure which will increase the chance of motion blur if the camera is not held still. Having said this, I have been known to pull over on the side of the road on a road trip because the Milky Way has been particularly bright and used a rock or the roof of the car to prop up my camera. When I do use a tripod, I use the Peak Design Aluminium Tripod but will link a few cheaper options too.
Focus
Getting accurate focus in photography is one of the most important things you can master. There’s nothing worse than spending a whole day (or night) shooting only to get home and find out all of your photos are blurry and out of focus. With Milky Way photography this is even more important and also harder to achieve. When I ask people where they struggle with Milky Way photos, it seems pretty unanimous that focus is something that really prevents people from getting good photos. Focusing during daylight is alot easier because you have plenty of light to be able to choose your focus area and check that it is in focus before you shoot. With night photography, the surroundings are dark and it is harder to verify focus.
Personally, I use my rear LCD to focus when I’m shooting the Milky Way. I find this method the easiest and quickest for focusing and I typically take a few test shots after I have done it to double check, zooming all the way into the playback on the LCD to double check that every star is tack sharp. Below is the method I use:
Switch focus mode to Manual (many lenses have a switch on the body of the lens as well)
Switch to Live View on your camera
Point your camera towards a bright star until it appears on the LCD screen and then use the digital zoom until it fills the screen
Rotate the focus ring on the lens until the star turns from blurry to a pinpoint
You’re all set – just be careful not to knock your focus ring if moving the camera!
I usually turn my LCD off again as it will usually drain some of your battery
Before and after focussing the lens on the Live View lcd. Note how the star goes from a large blur to a pinpoint dot
Settings
Once you have the focus set, you just have to decide on your framing and shoot away! This brings us onto our next topic, which is settings! There are three main settings to master: ISO, Aperture and Shutter Speed. Without going too deeply into camera settings, ISO controls the light sensitivity of the sensor, Aperture controls the amount of light that is let in and shutter speed controls the time that the shutter is open. For low light and night photography, you will need to let a lot of light in to make the scene visible.
ISO -I would recommend starting around ISO3200. Depending on the quality of your sensor, this should be sufficient to make the scene bright without getting too much noise. Noise is the grain that you see in your photos when they are taken in low light. Obviously the lower you can get your ISO the better, but editing software like Lightroom and Photoshop can do a pretty remarkable job of removing noise in post processing.
Aperture – Aperture (also know as the F stop) refers to the size of the opening on the lens. As discussed earlier, you ideally want a fast lens, and you want to leave that aperture wide open at F2.8or lower. If you are working with a kit lens, you will likely only be able to get it down to around F4 and although this will increase the noise somewhat, it will certainly be sufficient to capture the Milky Way or the stars.
Shutter speed – This is the important one when it comes to Astrophotography. If your shutter speed is too short, the picture will be very dark and will not capture enough detail. If it is too long however, you will start to capture the blur of the stars as the earth rotates and you will get star trails (which is totally ok if thats the look you are going for in your photo – we will discuss that a little more later on). I find the ideal shutter speed for a 12-14mm lens to be around 10-13 secs. At 13 seconds I will typically start to see a little bit of blurring or star trailing however not enough to impact the image greatly and those extra 3 seconds leave a little more detail in the foreground.
For Phone photography, you want to set your aperture as low as possible if this is an option, and you want to make your shutter speed as long as possible. For the IPhone 12 Pro Max this is around 10-30 seconds on the night mode (You will have to have your phone on a tripod for this or at least rest it up against a rock or something sturdy).
Composition
For the most part, composition is an artistic choice, although it is recommended to follow the rule of thirds same as you would for most other landscape photography. Composing the Milky Way can be tricky depending on the time of year, as the beginning of the year in the Northern Hemisphere will find the Milkyway sitting horizontal across the sky and towards the end of the year you will find it vertical.
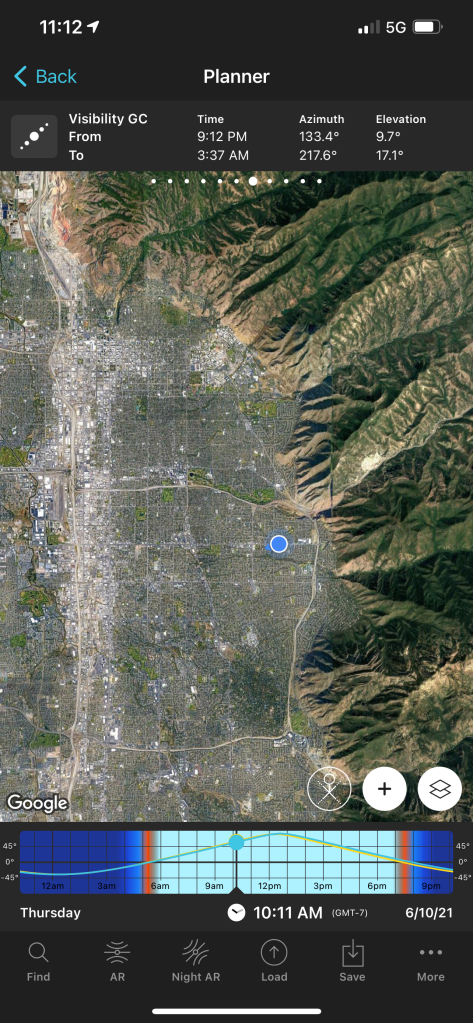
If you have a certain composition in mind, by far the easiest way to see when you would need to come back to shoot Milky Way would be to use the PhotoPills app. It is a paid app, but at $10 you get more than your money’s worth when it comes to shooting the Milky Way. The app itself can do far more than help with composition, including information about moonrise and moonset as well as phases, sunrise and sunset, when twilight hours begin and end and what time the galactic core becomes visible and its elevation in the sky. It can also help by calculating Exposure time for star trails, max exposure time to avoid star trails, and can calculate how long a timelapse would be depending on the number of photos you have and what your shooting interval is. We won’t go into too much detail in all of these (maybe I will do another post on PhotoPills alone) but all this to say, the $10 is well worth it.
The feature I use the most in PhotoPills is the Night AR. This basically allows you to hold your phone up to the composition in front of you and by swiping left and right, it will show you where the Milky Way will line up at a certain time and date. You can manually change the time and date, or just scroll until you get the composition you want. Every time I hike a new trail, I keep Milky Way in the back of my mind, and if I see a comp I’d love to line up, I check PhotoPills and see what date and time I would need to come back. I usually then screenshot the PhotoPills screen so I have a note of it if I want to reference back while planning.
This app is seriously a game changer when it comes to Milky Way and I often use it when I’m shooting in the dark as a general note of where to aim my camera. Once you have your composition set up using the app, I typically will boost my ISO up really high just to take a test shot with a shorter shutter speed and make sure everything is lined up. Just remember to put it back down to 3200 or so when you are ready to shoot.
Screenshot of PhotoPills showing the Galactic Center visibility in the top bar
Post-processing
So you’ve been out in the dark, you’ve set up your camera and taken your shots, and you finally made it home and can’t wait to see what you’ve got. The first thing to remember is that unless you are somewhere REALLY, REALLY dark, the Milky way is not going to be really visible in your shots straight out of the camera. Typically you will be able to see the galactic core faintly, and we’re going to take a look at how to enhance the image so that Milky Way shows up how you see it in real life. Obviously something to remember is that this part of the process is also an artistic preference. Personally I prefer a more blue tone to my Milky Way because I think it looks the most visually pleasing, but you will definitely come across some people who think it is sacrilegious to edit the Milky Way outside of its natural colour, and thats OK too. Remember that photography is just as much of an art as a science, and that the way you edit your photos is totally up to you.
When I process my images, I typically do this in Lightroom. You could also use CameraRAW, Darkroom, Photoshop or any other editing software of your choice, but I’m most familiar with Lightroom and I love that it syncs back and forth between my Iphone and my laptop, so I can pick up editing where I leave off when I’m on the go.
Before and After of this Milky Way shot from Colorado 2020. Edited in Lightroom mobile app
Import
When uploading the files into Lightroom, I always apply an ‘Import’ preset to all of my photos, which includes lens calibration and the Adobe Landscape colour profile.
Alignment
I do my best to get my horizon line straight in the camera so I usually don’t do too much editing on this front, but if you need to do this, I would start here. Once your alignment is good, we can move into the Basic Tab.
Basic Tab
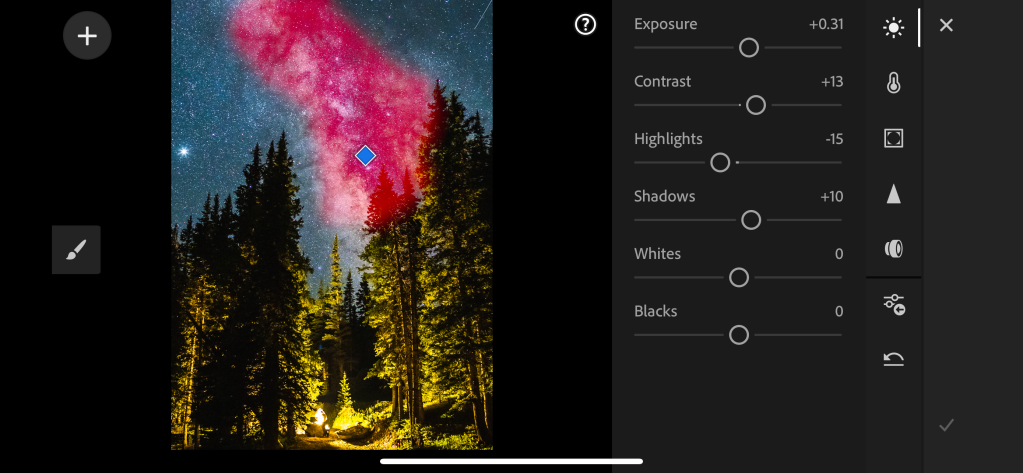
I usually keep my photos in Adobe Landscape. This makes the colours a little more saturated and improves contrast. Many of my images already have a pretty cold temperature and that blue tint that I like. I sometimes reduce the temperature ever so slightly give me the bluish look I like. Sometimes it can end up a little green, so I like to increase the pink tint to bring it back to a more purpley-blue.
Next I increase the exposure slightly. Most of the darkness in your photo is going to come from the foreground in these photos, so I usually increase the Exposure a little and then use the shadows and highlights to do the rest. I increase the contrast slightly. Increasing the highlights in a photo where there is some light pollution will mostly just brighten the areas of light pollution instead of the highlights in the Milky Way itself, so I usually reduce the highlights to prevent some of the airglow, and increase the shadows to bring the foreground back from the dark. Increasing whites will create some contrast in the core, but will also bring some of that airglow we removed back in, so use sparingly. I have recently purchased John Weatherby’s ProPanel and it has some incredible time saving shortcuts for removing airglow/light pollution.
Milky Way photos are some of the only ones that I really pump up the Clarity on, and this is because it brings nice contrast into the core. I will usually also Dehaze by around 9 or 10 to again increase contrast.
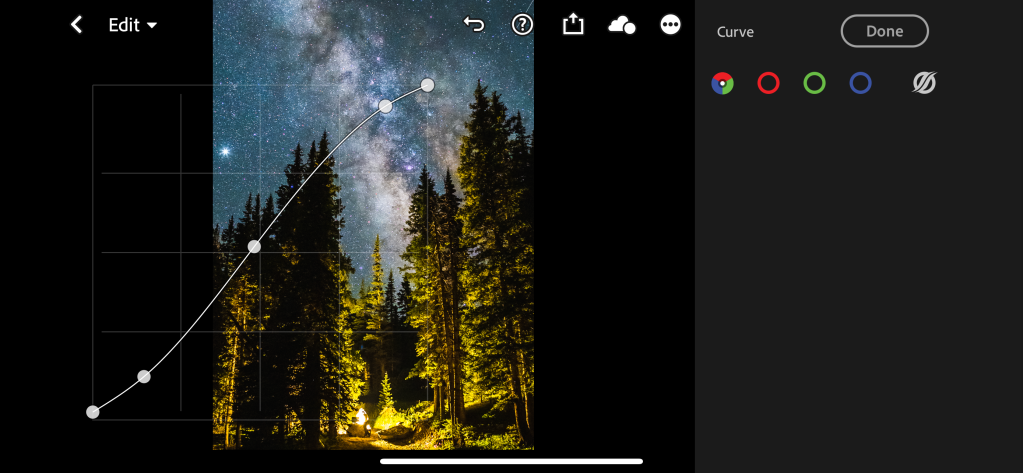
Tone Curve
I use the tone curve pretty sparingly but I do put in a slight S curve here. You can pretty much play with this to your taste, but remember the top right corner controls the highlights, the middle the midtones, and the bottom left corner – the shadows.
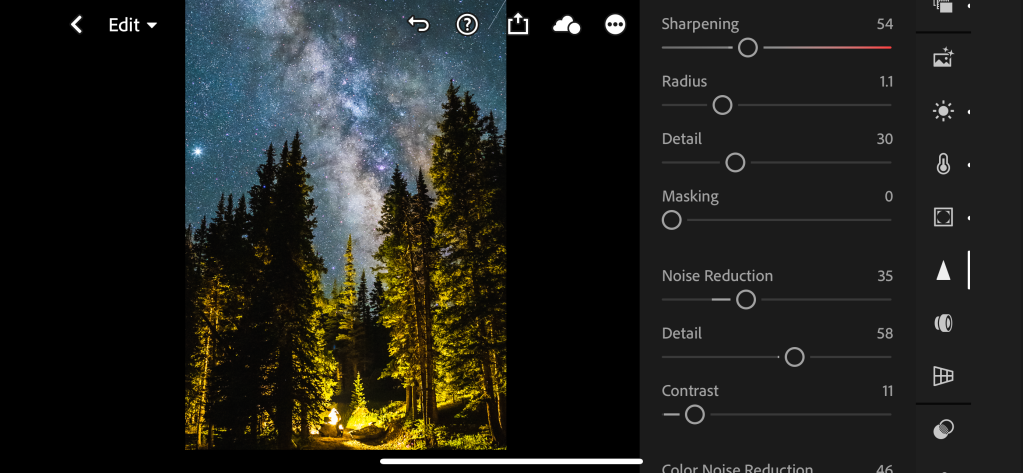
Detail
Here is where you can take care of your sharpening and/or noise reduction. How much noise reduction you need is mostly dependent on the quality of the sensor on your camera, how low (or high) your ISO was, and how well lit your foreground was. Noise reduction removes some of the graininess caused by the low light conditions in your Milky Way photos. Be aware that the more noise reduction you apply, the more detail you will lose in the photo so you will need to find the right balance between the two.
Masks/Filters
I use both gradiented and selective filters in many of my Milky Way Photos to enhance the contrast and bring out the details of the Milky Way. I am definitely still learning ways to do this, but I mostly use a gradiented filter to darken the sky again once I have brightened the foreground and selective filters to increase clarity, dehaze and increase whites back into the sky. In this particular shot I used a selective filter to brighten the milky way without blowing out the highlights from the lamp.
Trackers
Star trackers allow you to use long exposures without getting star trails. Essentially the tracker will move in harmony with the rotation of the earth so that the stars do not get blurred. There are a few different options when it comes to star trackers, including battery powered and chronological ones, and I personally went with the mechanical version so I don’t have to plug anything in or worry about it running out of power on a long night. The iOptron SkyTracker is what I ended up getting (thanks mum and dad for the birthday present!). Something to consider with trackers is whether you want to shoot Milky Way landscapes, as this will require a composite photo where you take an evenly exposed photo of the foreground and blend it with a long exposure photo of the Milky Way.
Overall, shooting the Milky Way takes a bit of practice, but there is no reason you cant go out on the next New Moon and bag yourself a shot. If there’s anything else you’d like to know, or anything I missed, please leave a comment below and I will answer them all!
Truth be told, so much has happened since this race, I wasn’t sure I was ever going to find the time to sit down and write about it, but a month of craziness has passed and I found myself with a spare moment on a Friday night in the middle of a global pandemic, and it seemed like a good time to digest it. This race has actually turned into a sort of reference point for me. With days and weeks blending together, Antelope Canyon was the last thing I really did before the lockdowns began. As a matter of fact, the race itself nearly got cancelled as little as 30 minutes before the 100 milers lined up at the start, due to the Navajo Nation closing down native lands the night before. After everything it took to get to the start of the race for me, I am so grateful to those who chose to let us run it, because the experience was so very important to me and I would have been devastated to get so close, just to be turned away.
I was lucky enough to get the Friday before the race off work, and I left Tucson around 1:30 in the afternoon to head up to Page to get checked in at the Expo. Because of the worries surrounding the coronavirus, Vacation Races had very wisely decided to limit the expo to the night before the race, but that meant getting checked in and buying race merch all before 7pm that night. I made pretty good time getting to Page, and was able to pick up my race packet and sort out my drop bag all before 6:30pm. I have to admit, it felt strange going all the way up there on my own, as going into this way back in June of last year when I had signed up, I had expected to have a support crew coming with me, and never expected to be driving – and running – the race on my own. Due to the car accident I was in in December, my training halted 3 months before race day, and I wasn’t sure I would be able to run. I was so thankful to be cleared by my doctor on Thursday before the race, but I was certainly expecting to feel the nerves trying to take on 34 miles when I hadn’t run more than 5 or 6 miles in that long.
I checked into my Airbnb right around the corner from the start line around 7:30pm and I was surprised at how calm I was feeling. The last (and only) two races I had run had both been half marathons and I remembered the deep pit in my stomach the night before the races and how nauseous I had felt the whole day before. I was unable to eat or sleep and the nerves had kicked in so badly I hadn’t gotten to sleep much before 2 or 3AM the morning of the race, only to wake up at 5 to head to the start. Something was different though this time around. I dont know whether it was the fact that I had had to concentrate on the drive up, distracting me from what was coming, or the fact that I was approaching this race with a more relaxed attitude of ‘all I can do is give it a go’ after all the obstacles that had stood in my way since the accident. I have to admit I think it was almost a naivety as well, in the fact that I quite literally had no idea what to expect the next day, or whether I was capable of reaching the finish line, or what that kind of mileage would feel like, during and after the race. My simple approach of showing up at the start line and seeing what I could do left me feeling a strange sense of calm with little more than 8 hours to go until the start. I prepped my kit and my snacks and climbed into bed a little before 10pm, laying my head down to the sounds of Stephen Fry reading Harry Potter (a tactic I was hoping would keep me calm and send me to dreamland – thank goodness it worked like magic!).
I woke up on race day around 5:30AM. My start time was 7AM and I wanted to hit up Safeway to get some bagels and a couple more Clif Bars before heading over to the Amphitheatre where we would set off. Something I had not really thought about before that morning was what the weather was going to be like, and boy am I glad I didnt because it was WINDY, and I probably would’ve never showed up if I had read the weather report before heading to Page. Sitting in the parking lot in the dark before the race started, I could hear the wind ripping through the rocks, and picking up clouds of sand, sending the car swaying gently as I wondered what the hell I was getting myself into. Strangely enough, I still wasn’t feeling very nervous at this point and honestly was full to the brim of excitement, ready and raring to get going and give this thing a go of it. When you book a race like this so far in advance, you spend hours and weeks wondering what the day will be like – how you’ll feel, what the conditions will be like, whether you should wear leggings or shorts, how many snacks you’re going to carry, will you get left behind, will you reach the finish line – and by the time you get to race day, most of that has gone out the window and you just want to do the damn thing. Getting out of the car to fill up my water bottles had me reconsidering my clothing options and I hastily changed my short sleeve t-shirt out for a long sleeve to try to keep the biting wind at bay, whilst silently cursing my decision to not bring a windbreaker of some kind, assuming I would be able to suck up the cold at the start line and not have to use the drop bag.
Feeling excited at the start line
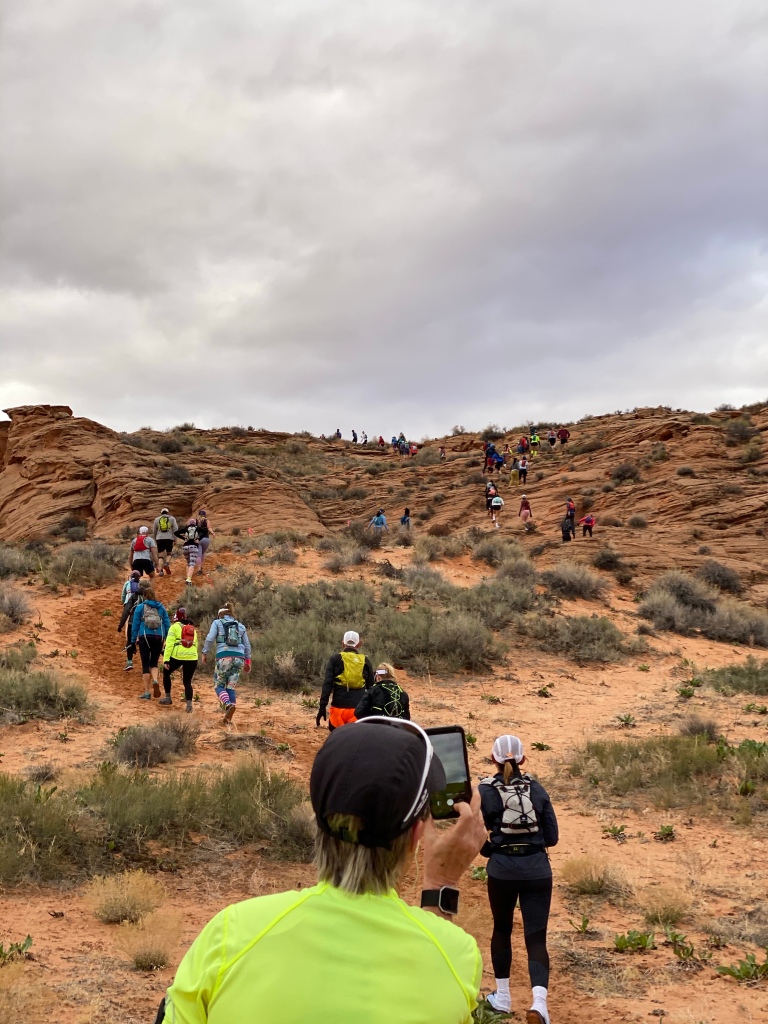
When it was finally time to line up, it was an odd sight to see the crowd heavily dispersed, due to efforts with social distancing and more than ever the adrenaline started kicking in. The sun was just about making its way up at this point and when the gun went off, suddenly the wind didn’t seem so brutal, the air not so cold. All I could think was ‘THIS IS IT!’. I was grinning ear to ear those first few minutes running through the parking lot and over the road to the sandy path that would least us through the first miles of the race. That joy and excitement was short lived though, as I started to realise how much of an effect the terrain was going to have on the race. The sand was deep and soft, and most people had slowed down to a quick walk, as running or jogging seemed to be counterintuitive to energy reserves.
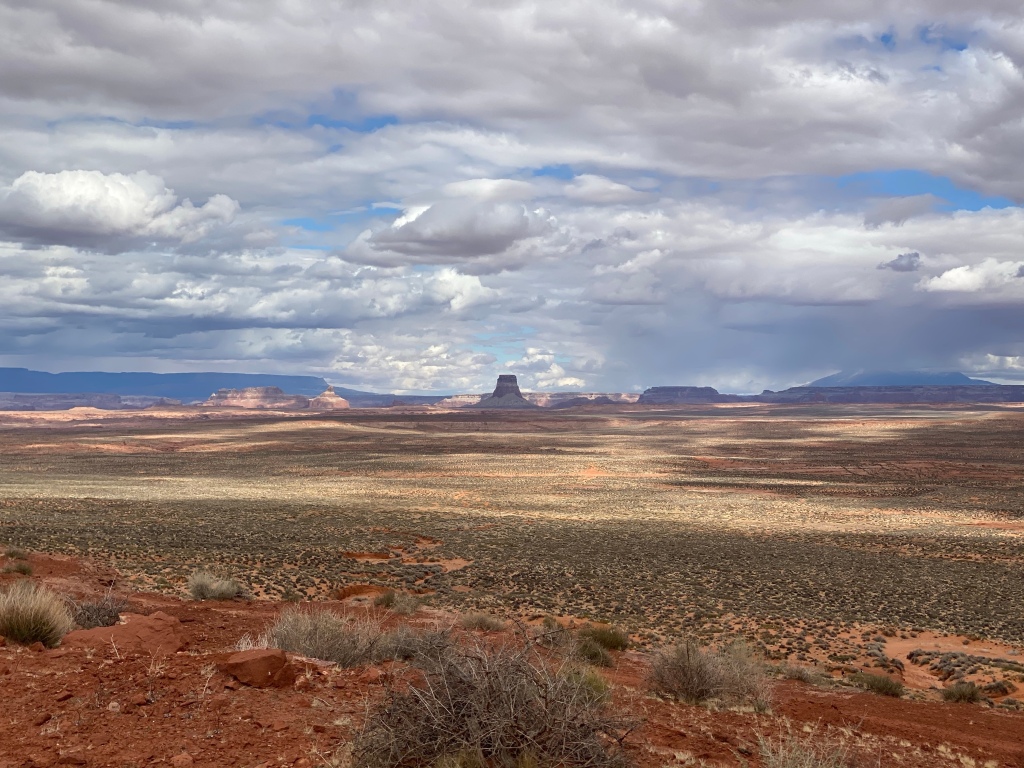
The sandy hills we were faced with less than a mile into the race
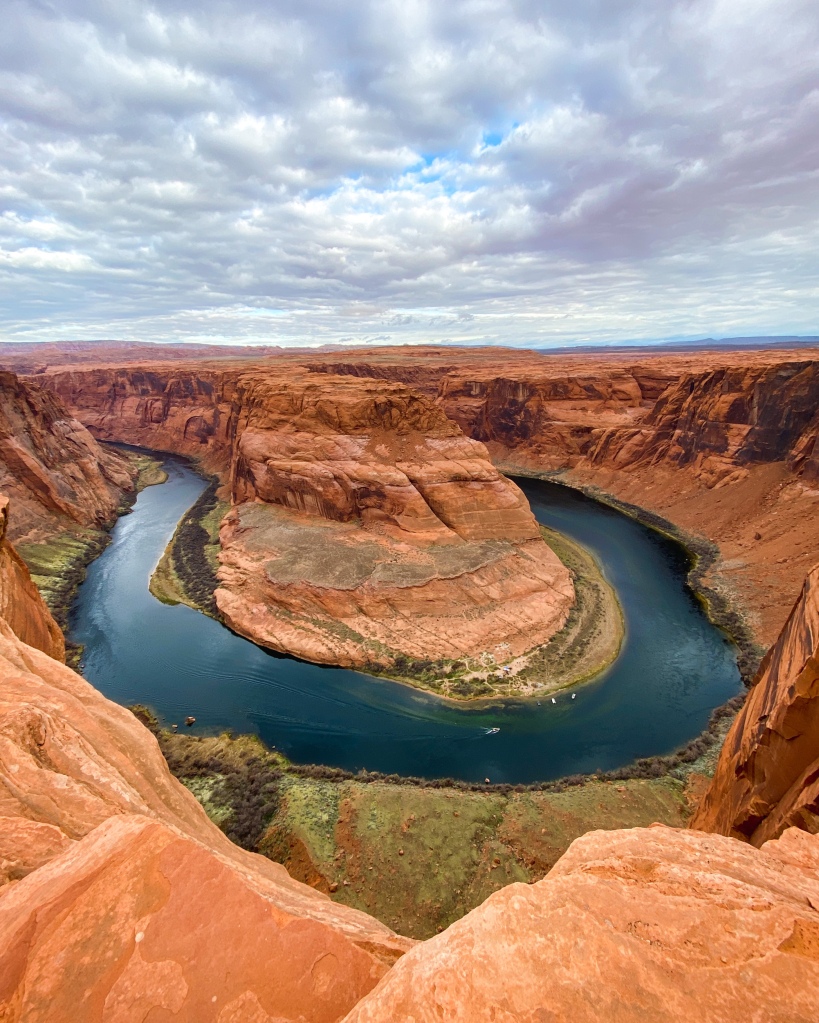
We carried along this sandy path for the first mile and a half until we reached Slickrock Aid Station. I met a lovely lady named Marta just before we reached Slickrock and after chatting briefly, we realised we were both running at around the same pace with the same general goal of finishing, and decided to become running companions for the rest of the race. We breezed through the first aid station, both keen to get to the next stop which was Horseshoe Bend and 4.7 miles. If you haven’t been to Lake Powell or Page before, the scenery out there is truly stunning, with vast desert landscapes reaching as far as the eye can see, but what most people come for – besides the intricate slotted corridors of Antelope Canyon – is Horseshoe Bend. Naturally carved into the rock by the ever flowing Colorado River, Horseshoe bend is overlooked from a rocky cliffside sitting approx 1000 feet over the river below, and gets its name from the distinctive shape it takes as it flows on its way. I had purposely avoided taking in this tourist hotspot up until this point, hoping that seeing Horseshoe for the first time during the race would put a pep in my step and provide me with motivation to keep going.
Horseshoe Bend
Once again, my tactics worked phenomenally, as my new friend Marta and I took turns taking pictures overlooking the massive river-bend, and shaking our heads in disbelief that places like this exist. This is truly one of those spots you will see online 100,000 times but you’ll never really appreciate until you’re stood right in front of it. After taking some time to soak it all in, Marta and I were back on our way, scrambling over the rough terrain of sand and slick rock, stopping many times to walk or scoot down the rocky shelves to head towards the next pink flag marking our route. I have to say, miles 5-7 were probably amongst the hardest in the race, for no reason other than the terrain was so uneven and slippery and we were forced to walk for most of it, watching our footing and regularly checking for the next markers to make sure we weren’t getting lost. I was having so much fun at this point still and had really settled into the excitement of the race, but it felt strange to walk so much at the beginning of the race and I realised very quickly that whatever race plan I had had was going to go out of the window very quickly with the landscape like it was. These interim miles before we hit the next aid station were long and slow and it felt more like a hike than any kind of running race, long distance or not. We lamented our vanishing race plans and justified our need to keep walking at this point instead of breaking into the half-run that many of our fellow competitors were doing, simply based on the fact that they didn’t seem to be getting much further than us but were using up energy that would be vital in the later stages of the race. When we finally crossed the road to Waterholes Aid Station, it would be an understatement to say that we were elated, having talked incessantly about our desire for some soda and some fruit when we got there, describing the intricate flavours and sensations of pineapple and watermelon, as well as ginger ale and sprite, during the miles leading up to it.
The crazy slick rock shelves we were running on for most of the first half of the race!
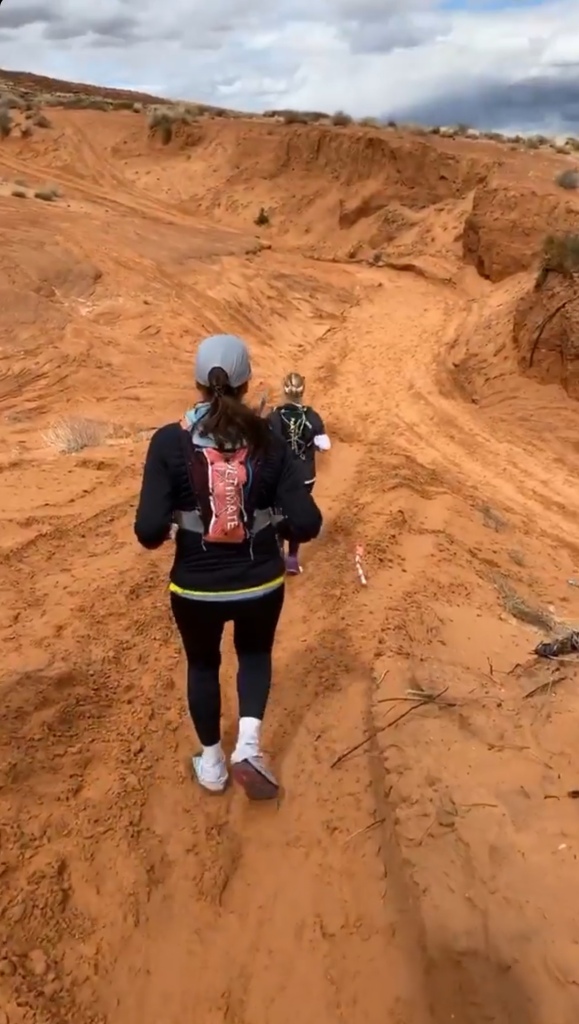
The other reason for excitement and Waterholes Aid station was the knowledge that the next segment of the race would take us through the slot canyons – the reason most of us had chosen to run Antelope Canyon specifically. Only the 50 and 100 mile courses take runners through the infamous Upper and Lower Antelope Canyons, but the 55k course does run through Waterholes Slot Canyons, a smaller and slightly shallower series of slot canyons winding through the wild desert rock on the way back up to the city of Page. By the time we had reached the slot canyons, we had been running for 12 miles, and although I was a little tired, I couldn’t believe how good my legs still felt and was stoked that I still hadn’t experienced any of the headaches I was so worried might ruin my race following my concussion. We spent a lot of time in the slots, taking in our surroundings, and snapping lots of pictures of the intricate patterns in the rocks, throwing the sand into the light rays and just generally experiencing this amazing section of the run. If there was one thing that I had set out to do during this race, it was to really enjoy it and soak it all in. It’s rare to get such unbridled access to these incredible places and I knew that the day would probably go by in a blur, so I wanted to really take the time to appreciate each moment of it, especially early on before the fatigue would start to cloud my thinking. Coming out of the slot canyons, we were faced with the steepest hill of sand I think I had ever seen (until mile 22) and we had a long trudge up it to break back onto the dirt road that would take us back to Horseshoe Aid Station for the second time around. I have to admit, when I started the race that morning, I had promised myself that I would be happy if I finished the 13.1 miles that would make up the half marathon (and qualify me for a medal) and if that was all I could manage, I would’ve had a good day. The next goal was completing 26.2, and with that finishing my first marathon distance, which would have culminated in a great day. My perfect-race-day-all-the-stars-aligned-someone-was-looking-over-me goal was to finish the full ultra distance of 34 miles. The road from the slot canyons to the Horseshoe Aid Station was flat enough in parts that we were able to get into a running rhythm for the first time and I was happy to check off my first goal on the way, spurring me on to the 16.7 mile marker back at Horseshoe Bend.
Waterholes canyon
Some very friendly guys helped us refill our bottles and get some snacks on board during this brief break and I was definitely starting to feel my body fighting back a little bit at this point. I knew that the most technical part of the race was over at this point, and that gave me the little bit of confidence to go back out on our way and head to the next station. We found ourselves running back up the road we had run down from the start, taking us back up over the ridge and into the city, ready to do our final lap of Page before we hit the finish line. I will warn you now, if you ever plan to run this race, save some prayers for the hill leading up to Page Rim Aid Station. When I saw that hill of sand coming out of the distance, I have to admit I almost cried actual tears, and dragging my ass up it 15 minutes later was no different. This baby was a thigh burner, and the soft sand made every step you took half as efficient as it should have been, as you were losing distance as you gained it slipping through the sand. When we finally reached the top, I was happy to have run the furthest I’d run, ever, up until that point, and was starting to believe that I was actually going to have a chance at finishing the race. Now, I knew well enough that although we had reached the half-way point in mileage by the time we got to the Page Rim Aid station, the race was far less than half over. A fellow ultra-runner and podcast host who was following my race for his podcast, Becoming Ultra, had told me the week before the race that 26.2 was usually halfway in terms of effort, and that the last 10 miles would drag out and therefore to focus on that as the midway point. I have to admit, he was spot on, as despite our good spirits as we started on our lap around the town, we had no idea how quickly things would change.
More sandy hills
I would say mile 24/25 was when I really started to feel the fatigue. My legs were aching with every step, my knees and hips were definitely protesting regardless of whether I stopped or started, and my mind was starting to struggle more to stay positive and conjure motivation, even though we kept trudging on. Marta and I found a rhythm of walking a bit and running a bit over these next few miles and the scenery, although beautiful, became less of a distraction and my thoughts became focused on putting one foot in front of the other. I don’t honestly remember much about these miles other than the sight of my feet moving along the ground and that they were literally the longest miles I’ve ever experienced. In one sense, I was excited that I was going to hit my second goal, and that I was going to run a marathon, but in another, I was so unsure of how I was going to do another 8 miles at this point, and every thought became focused on moving forward. I began counting to 100 forward and backwards and Marta and I’s chatter became less and less frequent. I was definitely holding her back at this point, and it’s safe to say that if she had not stuck it out with me at this point, I don’t know if I would have kept going. At minimum, I knew I had to at least make it back to the next station in order to drop out, and although my legs actually felt ok (they hurt but not enough to stop me running) I began to feel super nauseous around mile 27. We had still been running spouts of 13 and 14 minute miles at this point, but now with every step I took, my stomach was churning and I realised a little too late that I had not eaten anywhere near enough to replenish the calories I had been burning and I knew if I was going to complete the race, it was going to be a long and gruelling walk to the finish line.
Our views leading up to the last miles of the race
The 5 miles between Powell Aid (27 miles) and getting back to Page Rim Aid (32.6 miles) were amongst the worst I have experienced. I recognise now that at this point, I was more in survival mode than race mode. So many negative thoughts were coursing through my head and the more exhausted I became, the more aggressively I plodded on, trying to ignore the nausea and the urge to stop or scream or cry ( I wasn’t sure which one might help). Marta and I had drifted further apart by this point and she was doing a downright stellar job of cheering me on and keeping me moving. I felt guilty and frustrated for slowing her down, but at the same time was worried about being left alone in these final stages. As the distance between us spread, I found myself breaking down into tears at multiple stages, frustrated that every corner we turned was a false one, and that there was no possible way the Page Rim Aid station could be this far away. Those miles were slow, torturous and emotional. My mental state was going between euphoria for getting this far and being so close to the end, to anger for how much everything hurt and how tired I was, to pure, plain exhaustion, which often left me dry sobbing and then shaking it off wondering how crazy I must look to onlookers. My mum, dad and aunt were texting me all through these later stages, and the pictures I had been sending of my smiling face were getting harder and harder to fake. The messages of support that were coming through filled me with pride and with motivation, but made me sob uncontrollably at the same time, which also made me feel sick. When we finally came around the corner to Page Rim Aid, I literally thought I might die. We had walked/ran over 30 miles by this point, and with less than 2 miles to go, I was quite sure I wasn’t going to make it. I sat in a chair at the aid station wondering if I was going to throw up, while Marta brought me pineapple and watermelon, and I remember sitting next to a guy who was running the 100 miler and his pacer, who looked on with sympathy and asked if I was OK. I replied that I felt very nauseous and thought I might throw up, to which the pacer enthusiastically told me, ‘Oh that’s totally normal, I threw up at my first ultra and it is basically a right of passage’. I couldn’t help but laugh at this guy and the huge smile on his face as they both assured me that I was so close and that it would all be over soon.
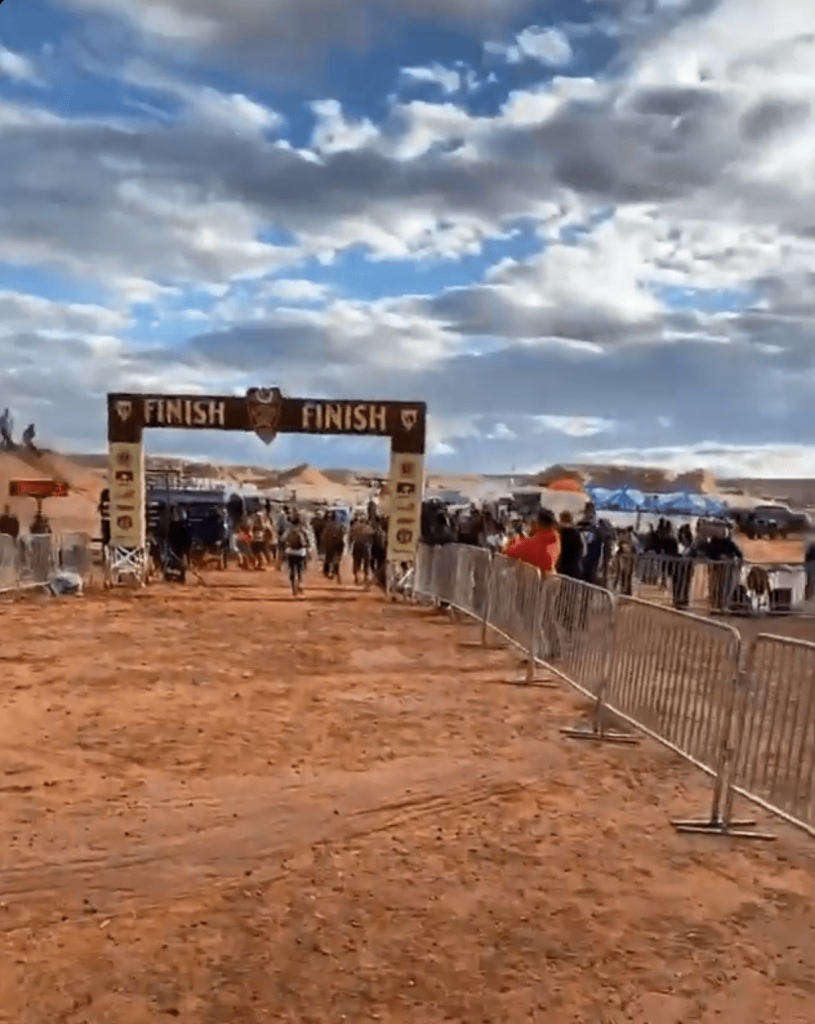
Begrudgingly, I stood up, hobbled back over to the trail and Marta and I began our descent down the giant sand hill from mile 22 to the finish line. I have to admit, I was not only nauseous at this point, but I was pretty dizzy too, unable to really focus my eyesight and not really able to coordinate my leg muscles as we tried to descend down the hill. My feet were slipping all over the place in the sand and I sort of stumbled and swayed down the hill while Marta ran on ahead. I spent most of the last minutes of the race willing Marta on, as I didn’t have the energy to catch up, but wanted so desperately for her to crush her finish. I was walking close to 27 minute miles in this last segment, and so many emotions were crashing over me as the finish came into view. Honestly, I still tear up thinking about seeing that platform in the rock, and the supporters off to the side telling me that I had made it, and just had to get across the staging. I had spent the past 8 miles telling myself I just had to keep moving forward and that eventually I would make it to the finish, but I don’t think I really let myself believe it until that moment. When I finally got up on that staging, I was able to pick up the pace and run the last few yards to cross the line, right into Marta’s smiling arms. I was so overcome with emotions at this point in time, but beyond anything, I was so grateful to see a familiar face cheering me home. It was hard not having friends and family there to share the moment with, but the circumstances leading up to the race meant that that was just how it ended up and I’m so proud of myself for running the race, on my own, anyway.
The most beautiful sight I’ve ever seen!
I spent the hours after the race sitting in my car in the parking lot waiting for the nausea to subside (the medical tent gave me a Zofran which quite literally saved my life and my stomach) and trying to let it all sink in. I started running just a year ago when I thought 13.1 miles was the furthest distance I would ever be able to achieve. I wondered, after that, if I could ever possibly reach a marathon distance, and I signed up for Antelope Canyon because I decided you had to reach for the things you were most scared of if you want to really live your life. My car accident in December almost derailed my plans of running this race, and surviving it, aside from the concussion, made me even more sure that this life is short and unpredictable. We have only limited moments that we are able to use to challenge ourselves and push the boundaries on what we think we are capable of, mind and body, and too often we think that tomorrow is promised and that ‘one day’ will be better that ‘today’. If my patients have taught me anything, it’s that the things we are most afraid of are the ones that shape us into stronger, more resilient versions of ourselves. The barriers we put up to excuse ourselves from the things that are hard, leave us living a life with less struggle, sure, but they also prevent us from ever overcoming those things and realising how much more we can be.
My new friend Marta and I – we made it!!!
I really hope that if you’re reading this, you know that you can do anything you put your mind to. Yes, it may be hard work, and yes, at times it may feel like your dreams or your goals are too big, too scary and too unachievable. But part of the accomplishment is putting those goals out there, and facing them head on, accepting that you might fail, but at least you tried. More often than not, we talk ourselves out of our biggest goals before we even give them a shot, but I hope you learn from my experience that our bodies and minds are capable of far more than we can ever imagine. I hope that you find the strength to give those far-out goals a run for their money. I hope you inspire people with your bravery and I hope that you look in the mirror and see all that you can be. These are all things I didn’t expect to get out of this race, but am so glad that I did.
So, I finally took the plunge and went full frame. I’ve been shooting on my crop-sensor D500 since Jan of 2018 and although I have loved it every day that I’ve used it, I couldn’t help but yearn for the full framed goodness all of my friends were shooting with. Gear envy is real, people. At the time of buying my D500, the only other option within my price range in the Nikon family was the D750 – full frame and also a DSLR body. I have to admit I was slightly put off by the price tag that came with a camera that had been released back in 2014 and despite knowing that it is a workhorse of a body, I still didn’t know if this photography thing was going to be a passion or a short-lived hobby. I ultimately went with the newer, more technically advanced, but crop-sensor, D500.
Fast forward 2 years and I truly LOVE photography. I have spent more weekends than I can count camping in canyons, backpacking through deserts and sleeping in my car – all in the name of experiencing the landscapes around me and sharing them with those back home. I was content with my purchase of the D500 because – honestly – its a badass camera, but the more time has gone on, the more I have found myself in destinations with grand sweeping views, and low light conditions that my D500 and its crop-sensor are no match for. Add on the fact that I bought a Canon Pixma Pro 100 to start printing my photos, and I realised that the D500 just wasn’t cutting it for me anymore.
Around October of 2019 I was starting to experience, more and more, the shortcomings of my choices and found myself often frustrated that even with the 16-80mm kit lens (a firecracker of a lens by the way) I was still not able to get the compositions I was looking for and I just wasn’t wide enough. I explored other lens options but having already purchased a full frame 70-300mm f/4 telephoto and a 24mm f/1.4 that I was using for astrophotography, I really felt as though investing more money in DX lenses was fruitless when I knew deep down that it was time to switch sensors.
Enter the Z6. Nikon’s answer to the mirrorless frenzy that is sweeping the photography world, especially in the travel photography subset, where portability has become an essential for international travel and backpacking alone – for weight and size reasons, as well as for discretion when in more high-risk areas. I can’t tell you why, but I’ve always been anti-Sony for reasons unbeknownst even to me, and I think that’s what kept me with my D500 for as long as I did. With Nikon finally entering the mirrorless market, it seemed like the perfection solution to my crop-sensor problem, whilst also helping me ditch the weight and bulk of my DSLR body and saving me thousands of dollars in new lenses.
I bought my Nikon Z6 in the Best Buy Black Friday sale, and I was super happy with the price that I paid, as well as the fact that the promotional deal also included the FtoZ adapter, allowing me to use my old full frame F mount lenses on the new Z mount. I highly considered going for the Z7 but in the end, financial reasoning won out and it just didn’t make sense for me to splurge on all that extra resolution. Aside from the kit lens, I did purchase the 14-30mm f/4 Z mount lens and I can tell you straight up, I don’t think I will ever have wide-angled envy again. This lens is ultra-wide, ultra-smooth and even at f/4 is pin sharp edge to edge – only struggling minimally when low-light conditions make the auto-focus on the camera act up (thankfully, a problem I’ve seen rumoured that the next firmware update from Nikon might fix).
All in all, the camera is lightweight but solidly built and throughout a winter trip to Yosemite this weekend in rain and fog, I can report, thoroughly holds up to its weather-sealing claims. The grip on the Z6 is similar to that known and loved by many Nikon users, and feels secure when held at any angle, a feature I love given how often I’m shooting hand-held. The layout of the buttons feels like home to any Nikon users, and the customisable function buttons and menus allowed me to create my perfect navigation for easy access to my most changed setting during mad sunrise and sunset shoots when light is ever-changing. The colour and dynamic-range of this camera blows my mind when coming from the D500 and I’m infinitely impressed with the RAW images, saving me hours in Lightroom when I get back home.
In conclusion, going full frame was the best thing I ever did, and I’m honestly glad that I waited as long as I did to make the move, because I truly believe I got everything out of the D500 and it made the transition to the Z6 that much easier. I’m excited to see what Nikon come up with in terms of their Z mount offerings, because what little taste I’ve had of them so far, has been phenomenal. If you’re on the fence about committing to full frame, I would definitely consider the benefits of the added light sensitivity, and at the end of the day, if you already shoot Nikon lenses, its a no brainer. The Z6 packs a mean punch and is a super capable, super portable full frame option.
If anyone has any questions about the Z6, please feel free to ask and I will answer as best I can! I’d love to know if you made the switch too, or if you’re considering getting the Z6 or Z7 – leave a comment below and let me know what you think!
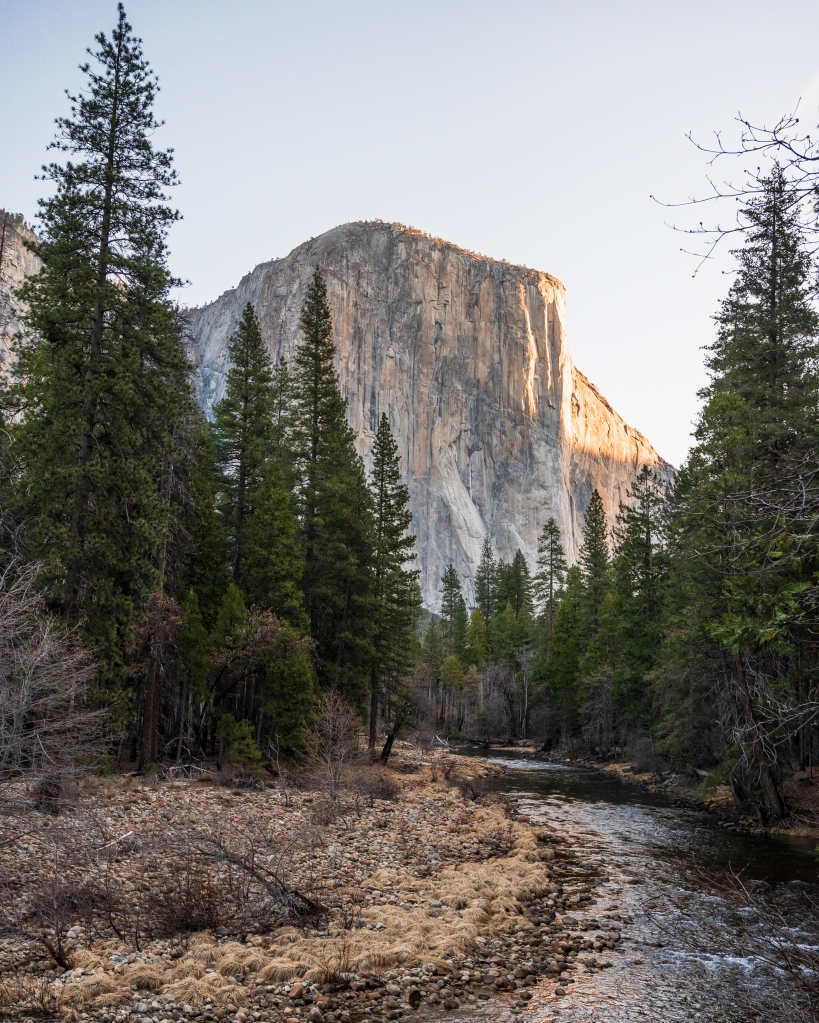
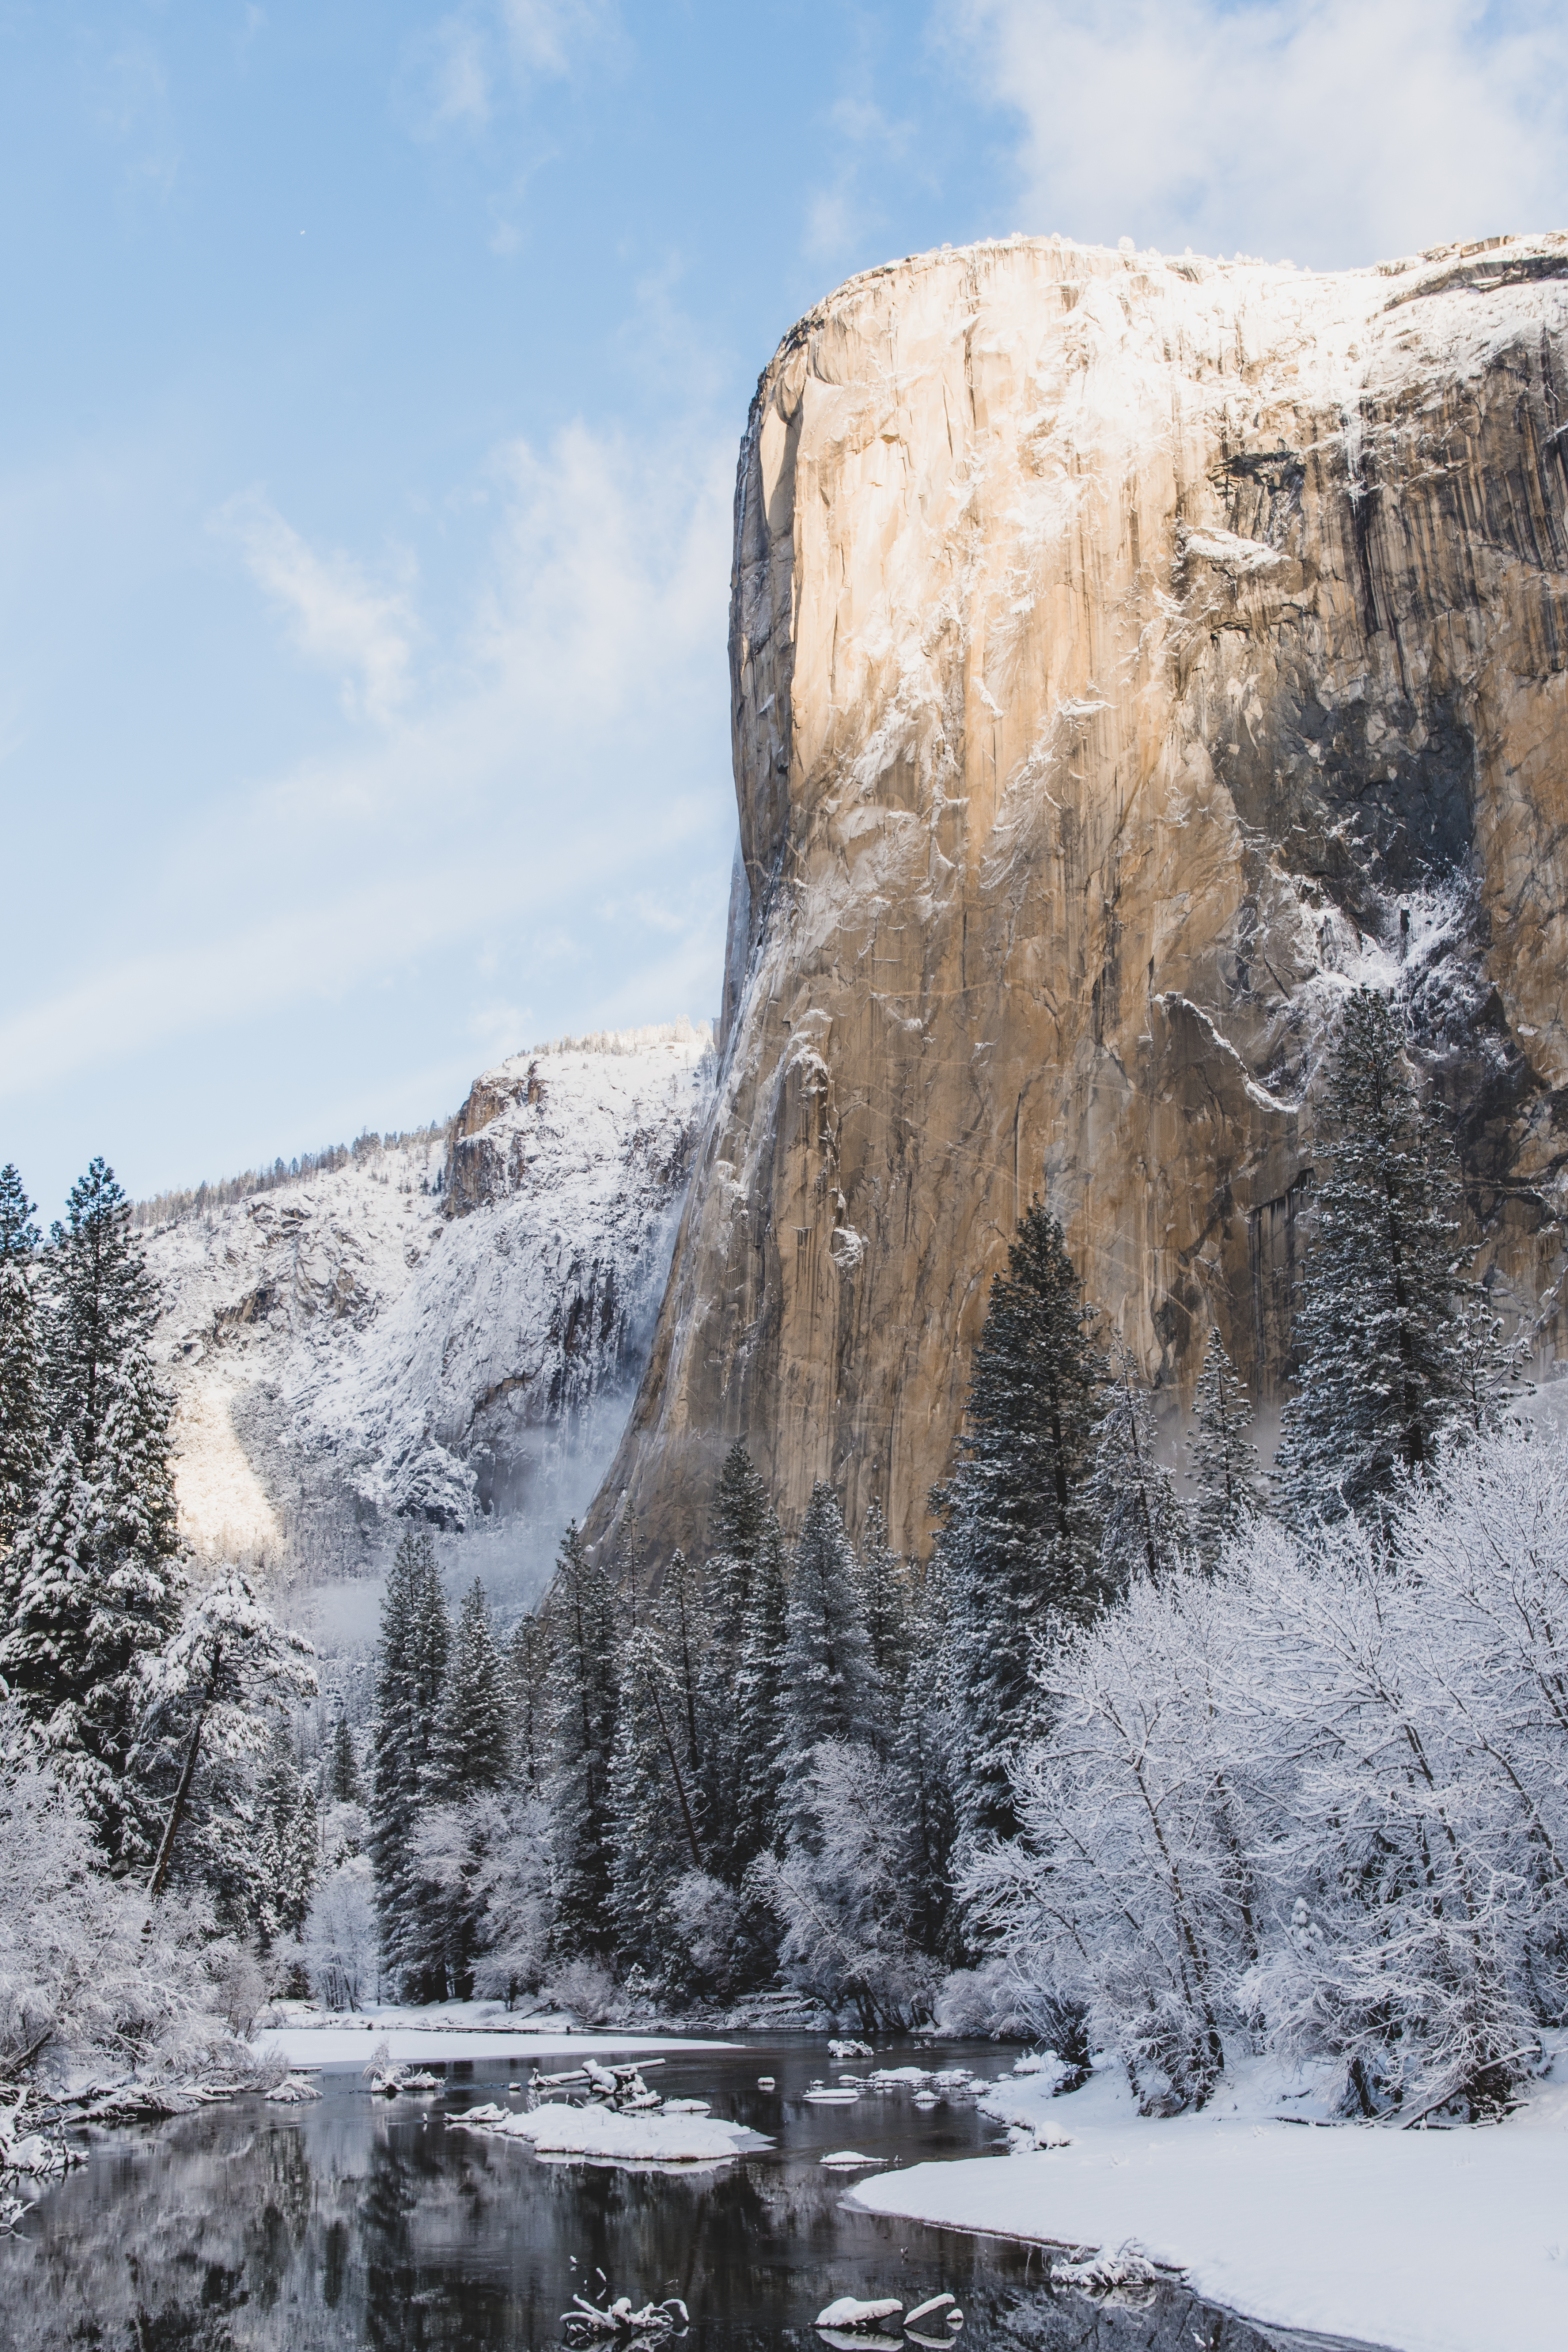
Last year’s firefall was undeniably epic. If you were on instagram last year and you follow the travel community, you would’ve seen at least one image from Yosemite’s annual Firefall occurrence. For those of you who don’t know, Firefall describes a natural event that usually takes place in a two week period of February in Yosemite National Park, California. There are some pretty specific conditions that lead to the phenomena, including a wet enough winter to create water in Horsetail Falls, the perfect angle of the setting sun and a clear enough sky that, in the moments following sunset, the cascading water gets backlit by the setting sun, appearing like a steady flow of lava coming over the top of El Capitan (arguably one of Yosemite’s most famous rock features).
2019 brought a particularly dramatic display of Firefall, following a wet winter and a heavy snowfall in the days leading up to the event. The temps had dropped enough to cover the entire valley with a blanket of snow, and visitors to the park were lucky enough to see those temperatures rise back up in time for the snow at the top of El Cap to melt and provide a huge cascade of water at Horsetail Falls. After seeing last year’s pictures popping up on social media, I knew that it was something I wanted to experience in person.
Fast forward to this year, and I took Thursday and Friday off work and, on Wednesday night, my friend Courtney and I embarked on the 12 hour drive to California to make it happen. We had heard the peak of Firefall was expected for the evening of Saturday Feb 22nd, however we knew our chances of seeing the phenomenon take place were pretty slim due to the lack of rain Yosemite has had this winter. With many of our friends abandoning the trip due to the poor forecast, we made the decision to head to Yosemite regardless of whether we would actually get to see Firefall because, well, Yosemite is still Yosemite, fancy lava falls or not. I have to say, I would find it hard to find an excuse not to go to the park when the option comes up, as it has quickly become my favourite US National Park, and the magic there is undeniable in every weather condition.
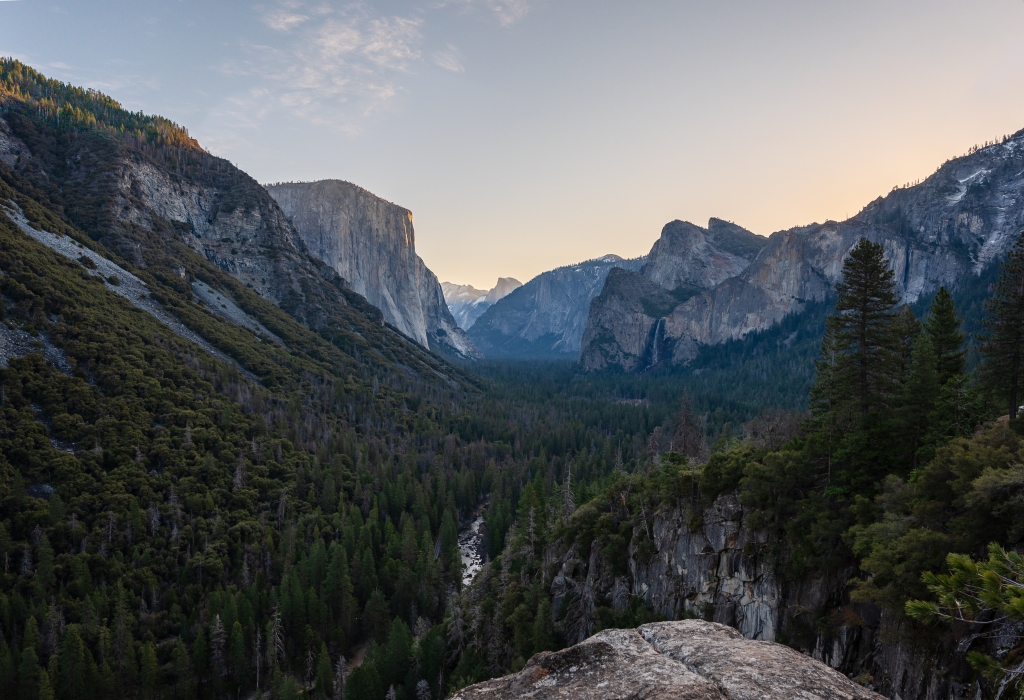
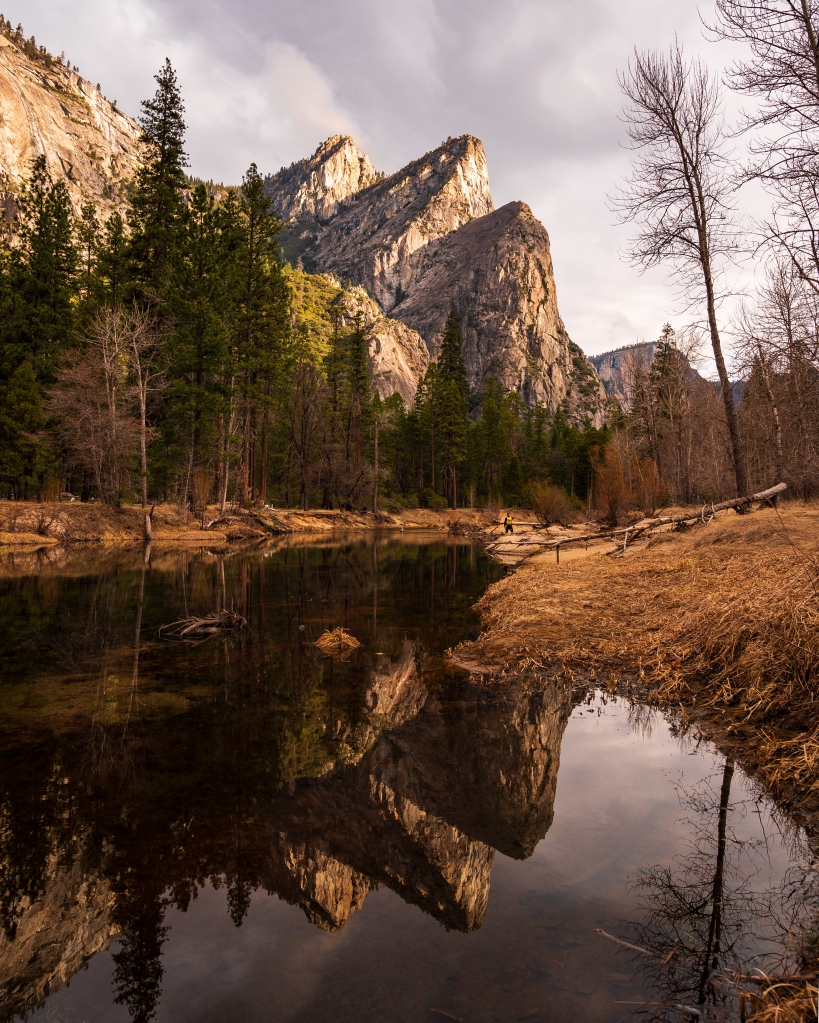
We arrived at the park shortly after 6AM and headed straight to Tunnel View to park up and catch an hour or so of sleep before sunrise. Our first shooting opportunity of the trip did not disappoint, and the valley slowly came into sight out of the darkness and we knew we’d made the right decision to come. Just look at that view!
Courtney and I spent the morning running around the valley floor and exploring all the reflections that the park was offering. One of the benefits of the lack of water was that the River Merced was pretty low, and the water was very still in a lot of areas, offering us up mirror-like reflections of all of the iconic rock formations to be found in the park. We were blown away by how peaceful the park was, and being a Thursday, it was relatively empty of the usual tourists. The weather was a little chilly, so after the sun had come up and made shooting a little more harsh, we headed to Degnan’s in the Village for a hot drink and a moment warming our frozen extremities by the open fire (a Yosemite must-do in the winter months). We spent most of the days in Degnan’s uploading photos, warming up and catching up on snacks. The early afternoons were spent hiking around the park, and our first evening found us scrambling up a rock pile to chase the setting sun as it engulfed North Dome.
Friday morning consisted of a beautiful calm start to the day at the riverbank under El Capitan and more impressive reflections for sunrise, and ultimately, a severe lack of water in the falls. The colder temps meant that the falls overall were light, but we did notice that towards the end of the day the snow was obviously melting as all of the falls seemed fuller and stronger. We were pretty pleased with the weather up to this point as it had provided some phenomenal shooting conditions, however we were starting to feel like there was no physical way for Firefall to happen. We started looking at other places to go, as we felt that the conditions were unlikely to improve in the Valley, but by this point in the afternoon, anywhere we would’ve driven had equally dreary weather and was still a good 5 or 6 hours away. We hiked up to Mirror Lake to burn off our dampened moods and although it had clouded over considerably by this point, we spent a nice hour or so sat by the water chatting and waiting out the overcast conditions.
On Saturday – peak day for the Firefall – we awoke to an overcast sky, and slept in due to the lack of sunrise. When we finally crawled out of the warmth of the car, it was to capture some seriously moody reflections down at the beach spot from the day before. It really is wild how much the weather changes the scenery in Yosemite, which is why I truly believe you can shoot it in any weather. We spent hours chasing the clouds as the reflections got crisper and crisper, exceeding our expectations for how still the river could possibly get.
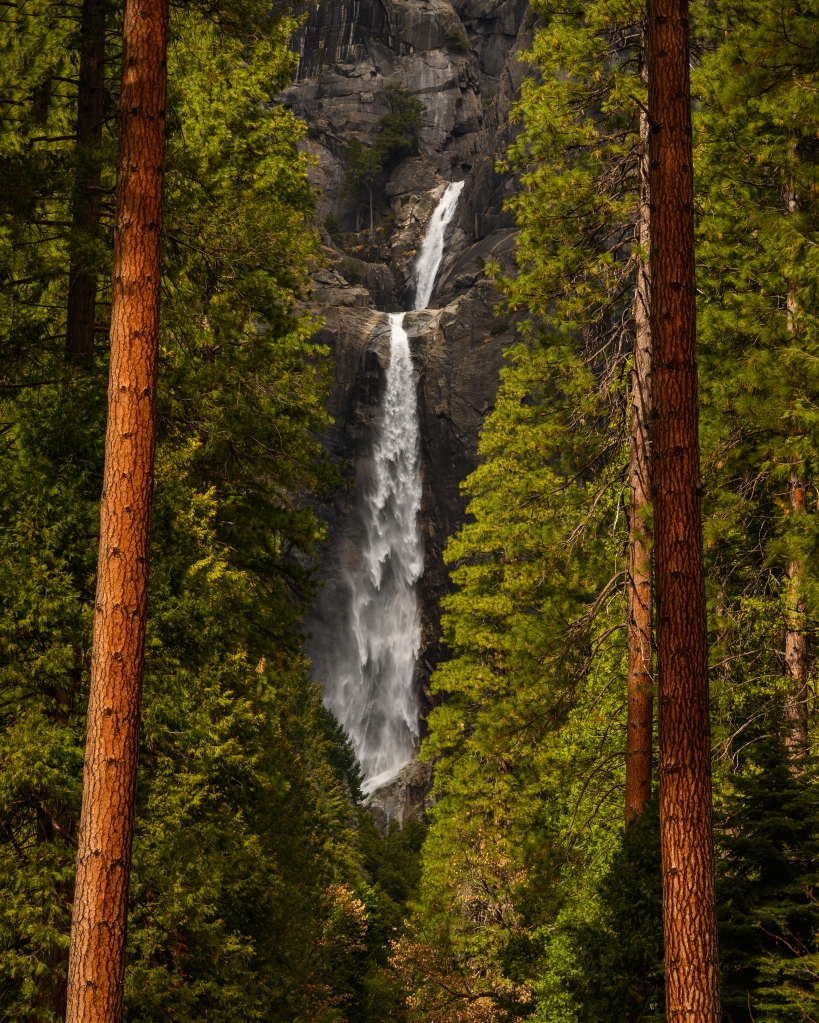
Following our reflection fun, we headed to Yosemite Falls to see if we could catch a rainbow just as the sun started popping through the clouds. After spending an hour or so enjoying the stillness of the park from the meadow, we headed back to Degnan’s to warm up and get some food in our bellies. We watched at the skies got darker and darker as the morning passed into the afternoon, and then, to our surprise, we saw it start raining! Hallelujah! Rain brought us a new found hope for Firefall that we had pretty much given up on by this point. Knowing the rain would cause some moody vibes, we headed to Lower Yosemite Falls, and then up to Tunnel View to wait it out. We weren’t disappointed and spent about an hour or two shooting at Tunnel View, watching the rain fall and the fog roll in and out of the valley. When it got to be about an hour and a half before sunset, we realised that we needed to head back down to the valley floor if we were going to attempt to shoot sunset at El Cap with the crowds.
Back down on the valley floor we realised that everyone and their mother had decided Firefall might happen following the rain and we quickly deduced that we would have to become members of the groups of people we had been laughing at earlier for walking over a mile to the viewing area due to the lack of parking. We had seen these people walking down the road that had been blocked off (a first for YNP during Firefall thanks to the crowds in 2019 that trudged through off-limits areas to get new perspectives and caused irreparable erosion to the undergrowth) in the past few days and wondered what exactly it was they were waiting for given that the falls were dry, and now here we were, potentially hiking a mile down the road with all our gear to watch a bum sunset over some pretty rocks.
There was enough of a chance to make it worth it to us though, and as we got closer to El Cap and the skies above us started to clear, our pulses started racing and we found ourselves hop-skipping down the road, breaking out into a near-on jog as the anticipation grew. Knowing we were going to get the sunset angle we needed just made us even more eager to see if the rain had created the falls we would need to see the phenomenon take place. As we rounded the corner to El Cap, we were dismayed to find it shrouded in fog at the top, leaving us desperately wondering what lay beneath and whether whatever was there was going to light up in the setting sun.
Not knowing what to expect, we hurriedly weaved through the throng of people setting up their tripods, looking for our perfect comps, all as the fog started to lift and the sun started to dip down below the horizon. We planted our stuff in the midst of a smaller crowd at the back and looked up, camera’s poised, just in time to see the nose of El Cap appear, and to the right of it, the bright shining slot of light we had waited for. Admittedly -it wasn’t last years heavy flow – but given the conditions and the lack of expectation we had had, it was about as close to a miracle I have ever experienced and the effect was certainly genuine. We were super stoked as well that on top of our Firefall effect we had gotten one of the most insane sunsets I have ever seen (albeit one that we essentially missed the best angles of because we could only be in one place at once) but all in all the experience was magical and we went to bed that night so happy and feeling like the magic of Yos had once again made the 12 hours of driving worth it.
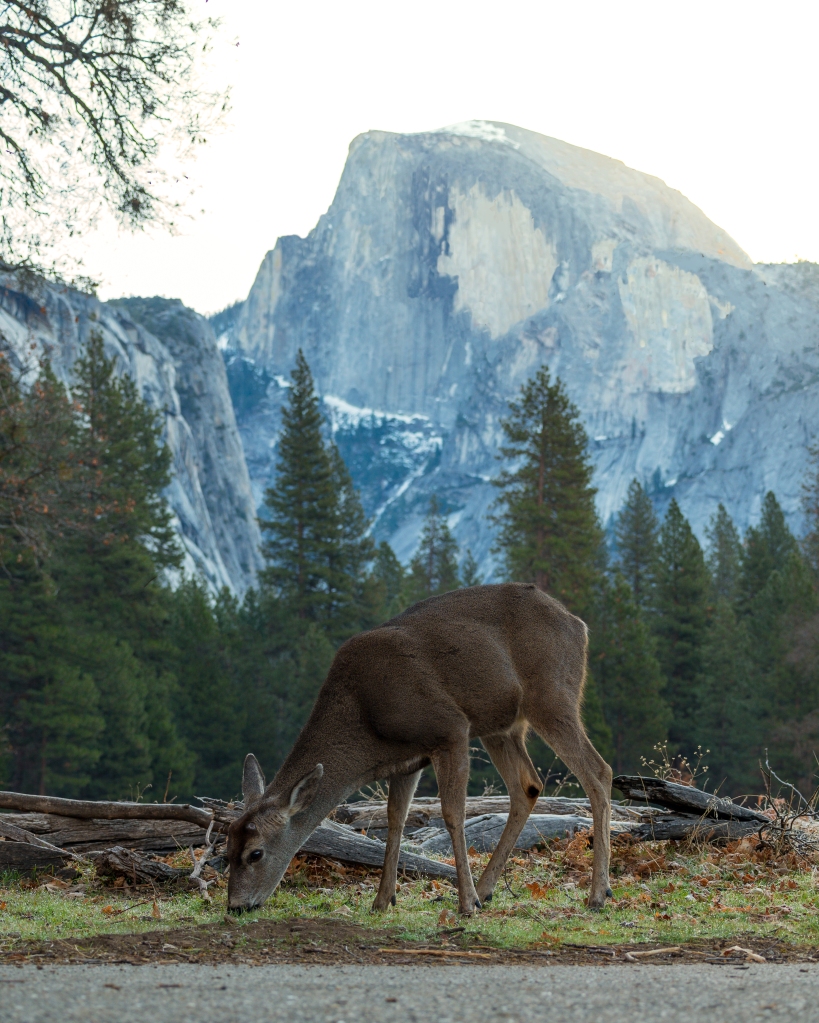
Sunday morning came quickly and we had planned to leave the park early after sunrise; a plan which was delayed by a missing sock, but fortuitously so. We were at Tunnel View getting ready to set out when Courtney realised she was missing a sock and we thought it might have fallen out the car that morning when she had gotten out of the car for one last bathroom break before we hit the road. This meant circling back down to the Valley for a retrieval mission, and thank goodness we did, because no sooner had we got out of the car for one last look at Half Dome, did we notice a herd of deer grazing in the frosty meadow. Eager to get our wildlife photographer on, we both headed down the path to sneak some shots, although we were surprised when the deer waltzed up to us crouched on the path and continued to graze, mere feet from where we were frozen still, framed by Half Dome in the background.
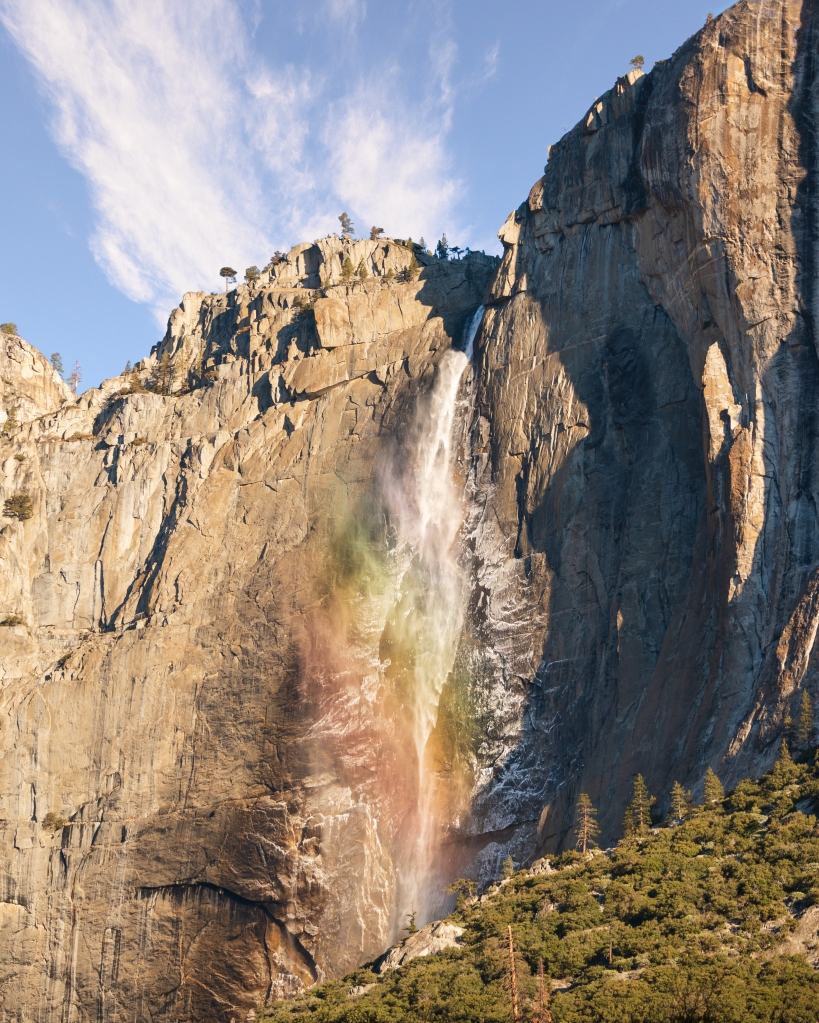
We excitedly turned back to the car and head back along the meadow when i noticed excitedly that Yosemite Falls was lit up in the background with nothing less that the elusive rainbow we had been searching for! This truly rounded off our perfect 4 days in Yosemite for Firefall. I think we both knew how insanely lucky we were to get the sheer variety of conditions that we did, allowing us to shoot multiple days in the same place and come away looking like we had shot in different seasons, let alone different places. Yosemite is just one of those places where you have to trust in the magic of the place. I hate to think how gutted we would have been if we had left when we considered it on Friday, but luckily for me, Courtney had faith in the wizardry and was able to pass that on to me too. Next time you’re in the park, just remember the magic of the Wizard of Yos, and remember that he always knows best, and will always bring you what you need! 😉
I hope bare minimum this encourages you to visit Yosemite National Park, and at best, I hope you decide to see Firefall for yourself next year, and join the race against the elements for what promises to be a spectacular trip either way! If you have any questions about our trip, ask them in the comments and I will be happy to answer!
I realised today that the last time I wrote this post was in 2017 and I was still using my first camera, the trusty Nikon D3400. Whilst that little guy has gone on to a new home, I figured it was time to update this section, as so much has changed since then.
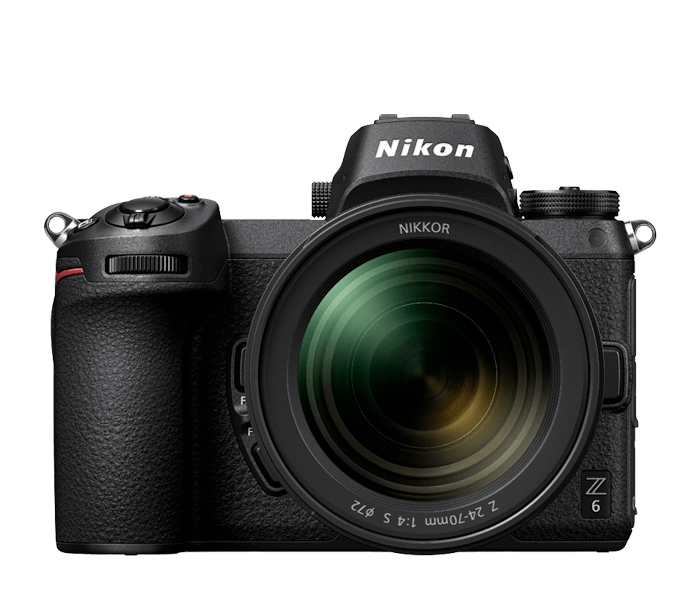
First off is my camera body. I finally went full frame in November of 2019 and currently carry my Z6 with me at all times.
Nikon Z6 – Mirrorless FX with 24.5 MP sensor
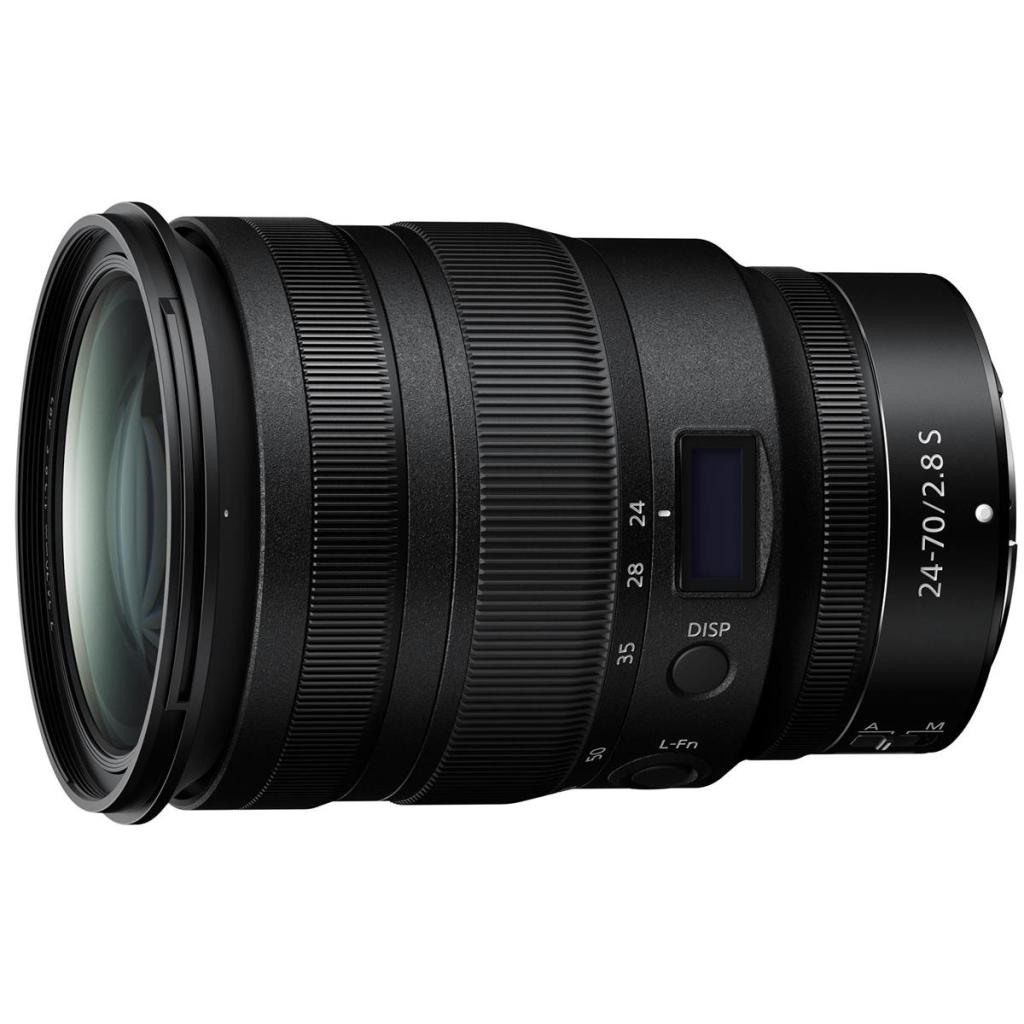
More often than not these days, my go to lens is the Z 24-70mm f2.8. It’s the perfect range for most of my photos within the travel photography realm and I absolutely love the sharpness and colour quality of the pictures.
Nikkor Z 24-70mm f2.8 S-Line
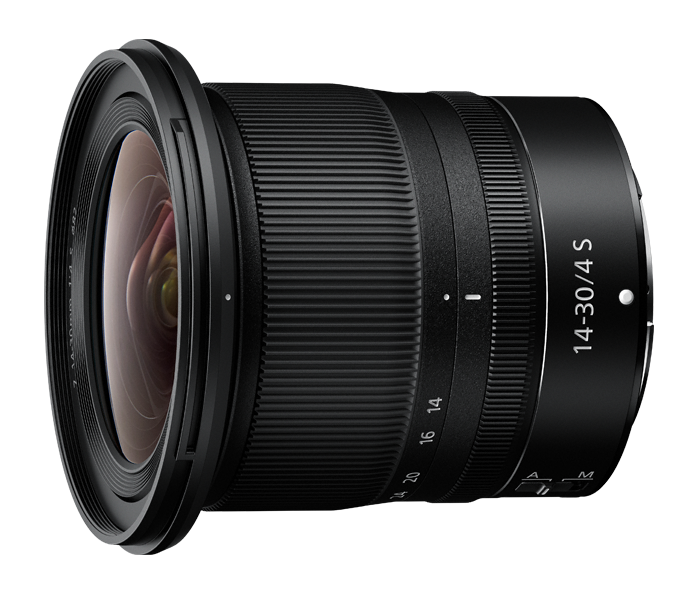
For ultra-wide angle landscape shots, my go to is the new Z 14-30mm f4 and I seriously cannot stress enough how much I love this lens. Aside from it being ultra-wide and catching all the things I used to miss with my D500 and 16-80mm, again, the picture quality of the Z lenses is so nice and this guy is super compact!
Nikkor Z 14-30mm f4 S-Line
For long distance compression, I love the 70-300mm f4.5-5.6. I don’t do all that much telephoto stuff, so I didn’t feel like it was necessary to spend the extra money on the f2.8 and I’ve so far not been disappointed by this option with my FtZ adapter!
Nikkor F 70-300mm f4.5-5.6E ED VR
So there you have it, the three lens kit I have with me at any one time. I am loving shooting full frame and although changing lenses on the Z6 is the most stressful thing in life with how close the sensor is to the opening, I love the compact lifestyle the mirrorless body and Z mount lenses bring.
If you have any questions about any of the gear I carry, shoot a comment down below and I’ll be happy to answer!
So here it is, it’s a month post race and I’ve finally caught up on sleep and work and hiked into the Grand Canyon for three days and then settled down enough to sit down and put some words together about the whole experience.
Firstly, I want to say how incredible Yosemite National Park is and that if you haven’t had a chance to see it for yourself you absolutely should take a trip, whether to run a half marathon or just to see it in all its glory. It’s my second time visiting the park but it was covered in snow last time I went so definitely a different experience going in the spring/summer! The views in that park are second to none and it truly is the most awe inspiring place to sit and grab a bite to eat, and to truly feel like a kid again!
The race itself was just outside of the park in the Bass Lake area and it was just as scenic and beautiful, with the race course running through the woods in the overlooking Sierra National Forest, winding all the way down to the lakefront town and finishing up on the shores of the lake itself.
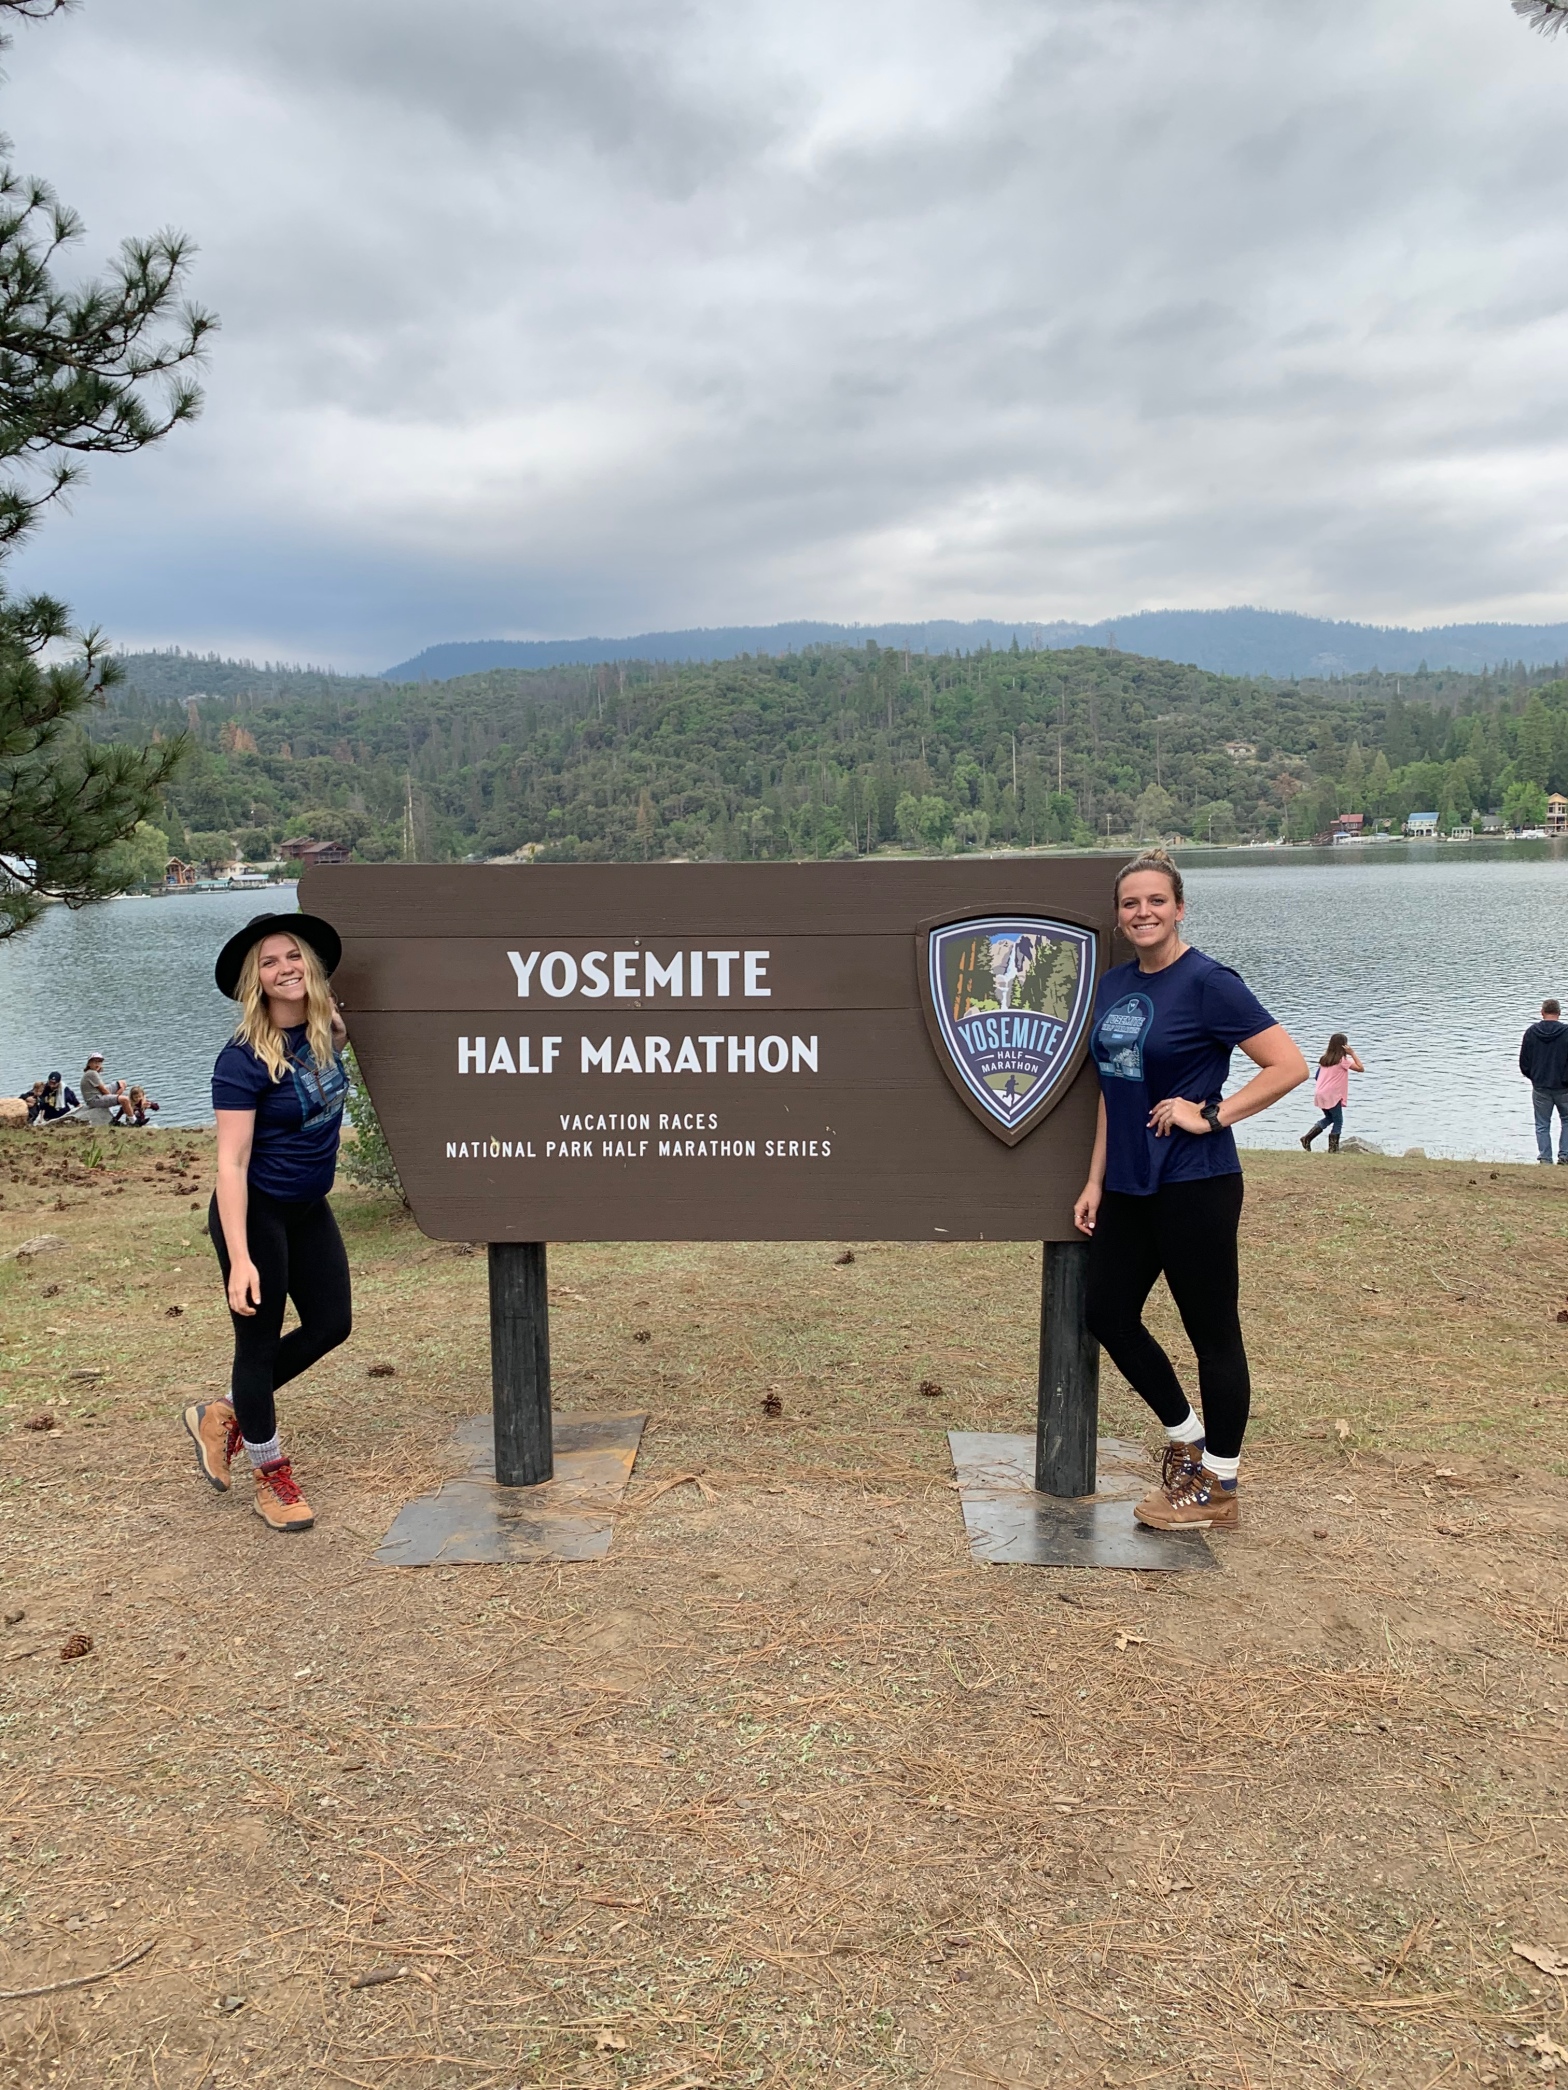
Kellie and I at the finish line the day before the race 📷: Shannon
We had been looking at the forecast every day leading up to the race as heavy rains had been forecasted and we were a bit worried about how cold it would be at the start, but as it happened, we had beautiful sunshine all 4 days of our trip and the temperature couldn’t have been more perfect, starting around 50 at the start and getting up to around 72 by the time we reached the finish line at the lower elevation. Speaking of which, I found the elevation had no noticeable effect on my breathing or ability to breathe which was a relief as we had hiked at Glacier Point the day before and I could definitely feel the elevation which kind of worried me.
Pre-race we stayed in an Air BnB on the outskirts of Bass Lake and this gave us optimal opportunity to rest compared to sleeping in the van, and it provided a hot shower for after the race was done! (Huge bonus). It was pretty hard to sleep because of pre-race nerves but after talking myself out of them by reminding myself I had trained for it and that the goal was to have fun no matter what, I eventually got some sleep!
The morning of the race, we woke up early but still rushed to the shuttle location thinking we might miss the last shuttle to the race ( I was in full panic mode) only to find that they were 10 shuttles short and we proceeded to wait for 2 hours before finally making our way to the start line. Now in all fairness, I don’t think it was the fault of the race organisers as I think someone else let them down, but waiting 2 hours at the start was a serious buzzkill and although it did quiet my nerves, it was freezing cold and a little bit more information would have been ideal if possible. Either way, when we eventually got it to the start I was raring to get this thing done, and just like that, we were off!
Secondly, I could not believe how beautiful the course was, and thirdly, how quickly it was all over! I really tried to take in every moment of it and believe me, I had a grin on my face so wide for the first 4 miles someone might’ve thought I’d lost it completely. Kellie and Shannon were betting on me crying at the finish line, but I was bawling happy tears by mile 2 and I couldn’t contain the excitement that I was finally doing this thing! The last three miles were incredibly tough as the downhill flattened out (even the flat ‘dips’ felt like mountains after the downhill) and I think I got ahead of myself and ate one too many Gatorade gummies which made me feel a bit nauseous and dizzy. With 2 miles to go I definitely did a bit of walking, but I was so amazed that it was almost over that I kept going, despite my legs wanting to give in.
Knowing my parents were waiting for me at the finish line was another thing that definitely kept spurring me on, and I was determined to finish the race running, with a smile on my face! When I crossed that line, it’s hard to describe the emotions that I felt, but it was a huge sense of joy, achievement, relief, pride and excitement, and when they put the medal around my neck, I felt on top of the world! Even more so to see Kellie come in just after me, and Shannon just after that.
Needless to say, it was an amazing experience in a beautiful place, and you probably won’t be surprised to hear that I already booked another one – the Lake Powell Half Marathon, also run by vacation races! Overall I was really impressed by the event and although there were some snafoo’s, it really didn’t take away from the experience for me! I also even got tempted by the Antelope Canyon 55k Ultramarathon in March of next year, but I’ll keep you posted on that….
The moral of the story is that anyone can run a half marathon, you just have to want it bad enough and train enough to minimise the pain during and afterwards! I was able to walk fine about two days after the race and I took 5 days off from running before doing a couple of short runs to ease back into it! Also happy to report no pain in my shins during or after the race, in fact I haven’t had much shin pain since the race either which is great news! If you’re looking into acupuncture, give it a try! It worked a treat for me!
I hope you learnt something from this and I hope it inspires you to lace up your shoes and get out on the trails! Happy running beauties!
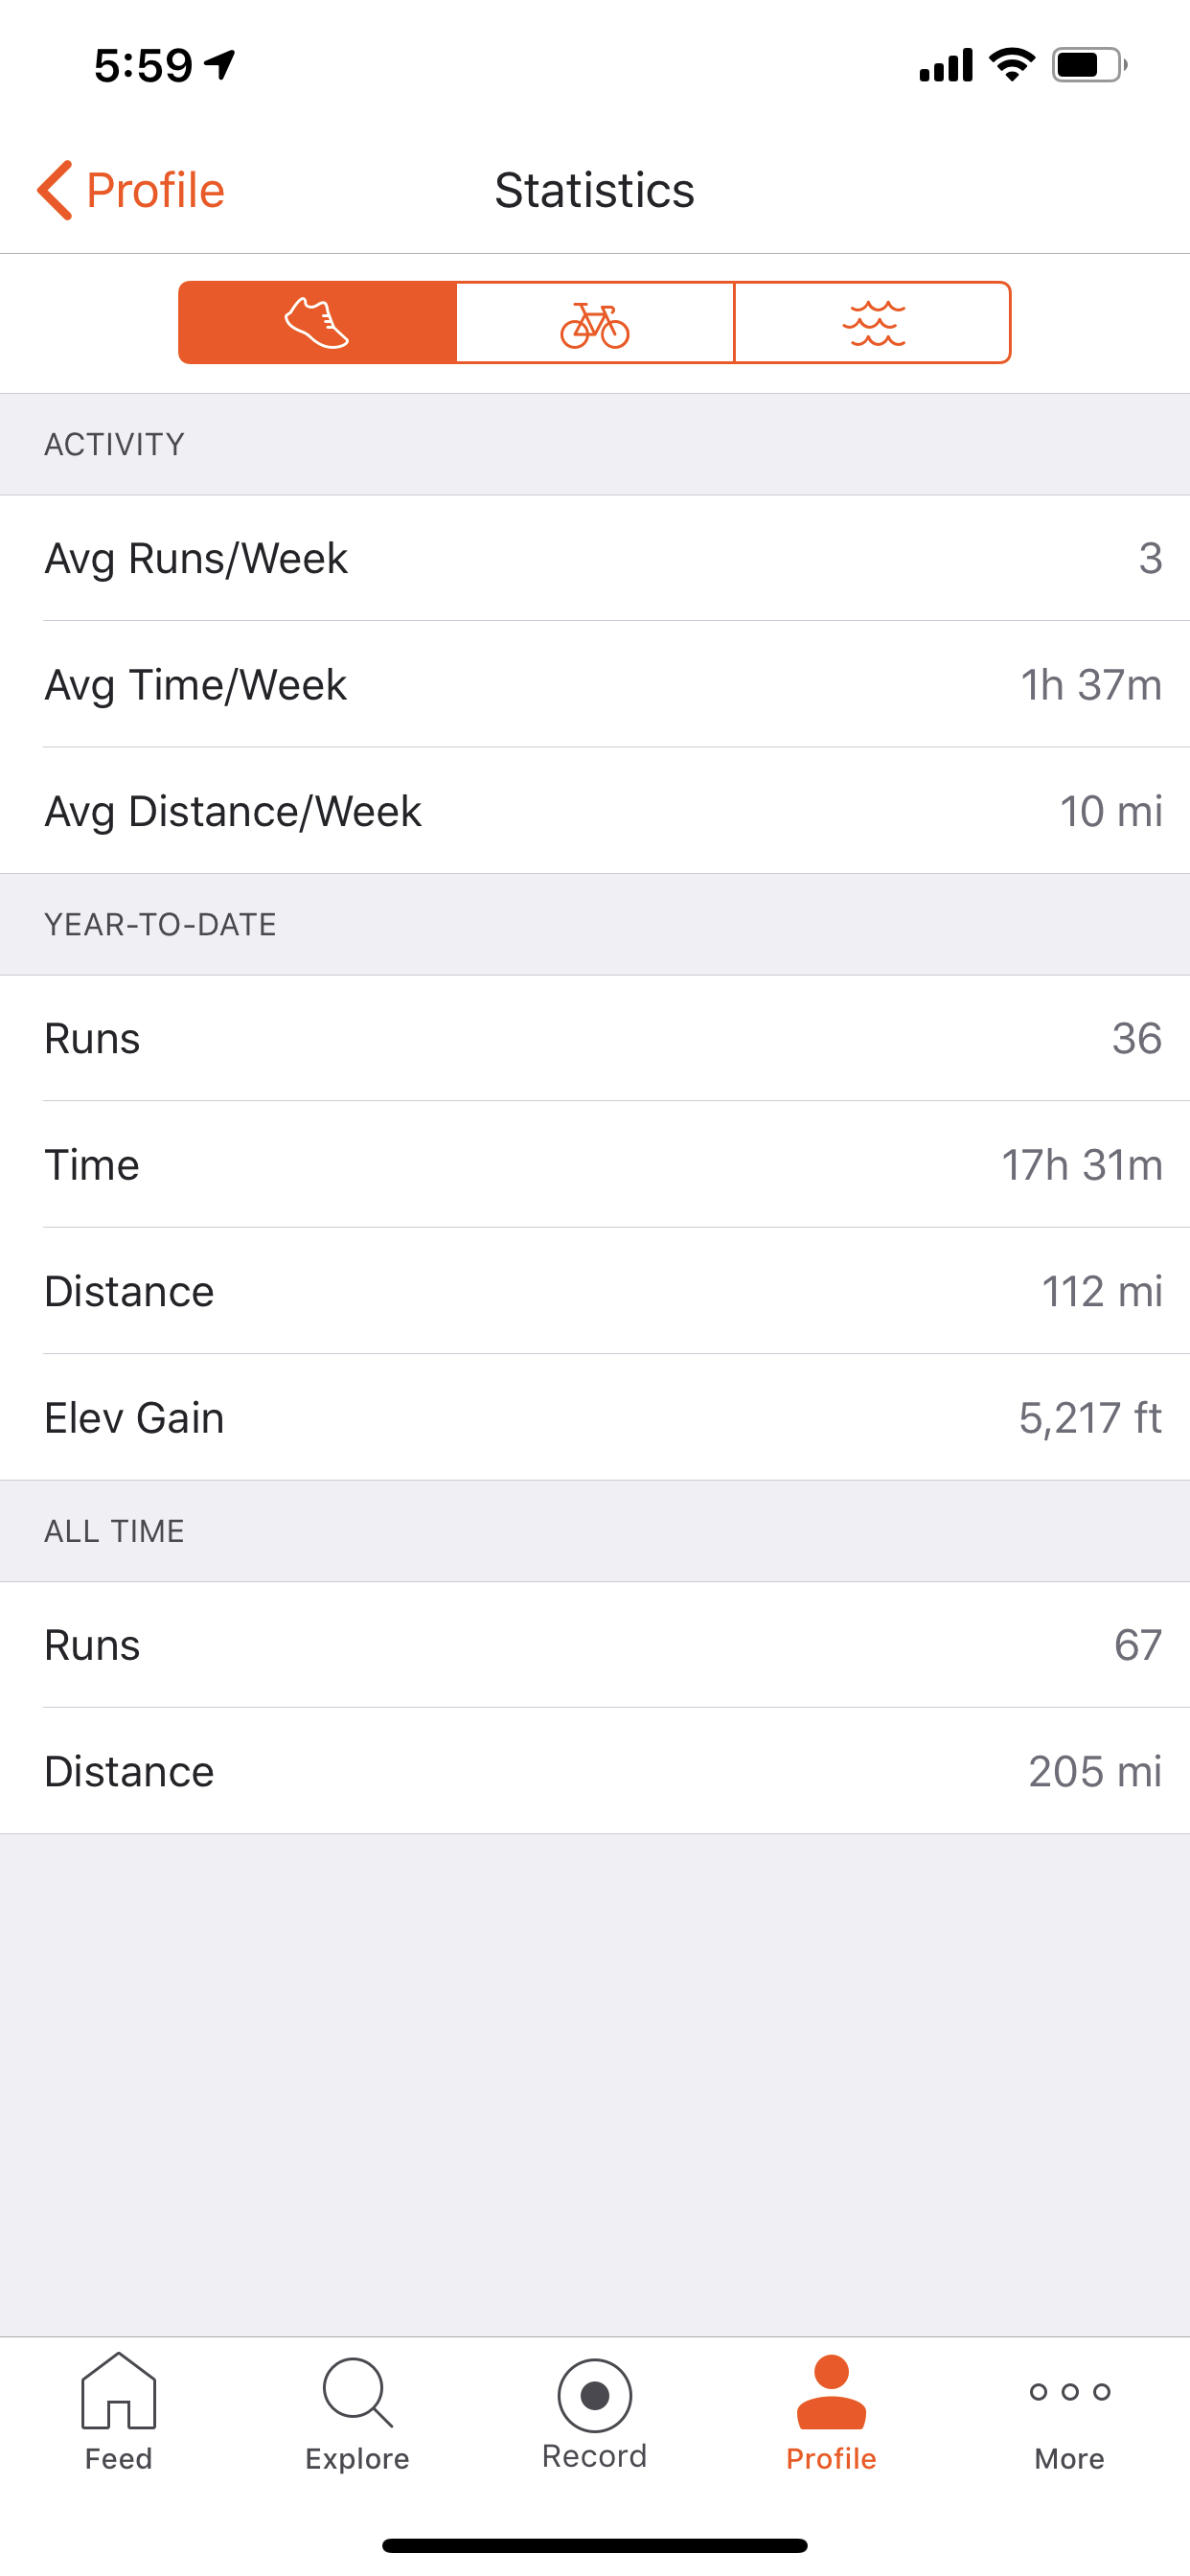
It’s been a little while since I left an update on Half- Marathon training, so I figured I would drop in and let everyone know how I was getting on. It’s officially 8.5 weeks until race day and so far this year I have run 112 miles, which kind of blows my mind if I’m quite honest. I’m midway through the fourth week of my 12 week Hal Higdon training plan and I can’t believe I’m saying this, but I think I might actually like running – and beyond that, I think I might actually enjoy running this Half-Marathon, come May.
I’ve been running now for 4 months, repeating the first three weeks of the HH plan until the real 12 weeks started, and whilst I knew my fitness would improve with consistency, I’m shocked by how much easier each run gets. Now that’s not to say that there aren’t days where my body feels sluggish and more effort goes into my runs, but it’s hard to believe that about 13 weeks ago I literally couldn’t run a mile at an 11:30 pace without stopping and just a few weeks ago I ran 6.5 miles at a 9:55 pace.
My shins have been bothering me a bit, and I’ve found KT Tape (Amazon) has been an absolute lifesaver for me in terms of getting me through the longer runs, and when it comes to the treadmill. Fortunately, as time goes on, the sun is rising earlier and setting later, so I’m hoping that by mid March I will be able to do all my runs on the road/path and cut out the treadmill all together. Does anybody else find the treadmill harder on your joints than the road? It seems to be the opposite to what I read online, but something about the treadmill makes my legs ache like crazy. Alongside the KT Tape, I’ve been experimenting with different compression garments too, most notably calf sleeves and compression socks, both during my runs and for recovery. Both of these help, and I have found a combo of the tape and compression sleeves really effective when I’m doing my longer Sunday runs.
I took a trip to Vegas earlier last month for work, and was happy to get in a 4.5 mile run on the Tuesday, despite the cold weather and my lack of appropriate clothing (note to self: do not assume that places will not be cold just because they usually aren’t – it snowed on the strip while we were there!). It’s safe to say that was the end of my running experience while I was there, mostly due to too many whiskey’s and not enough sleep (hey – you have to work hard/play hard). As soon as I got back, I picked up where I left off with an easy 4 miler on Sunday and although getting back in the groove has been tricky this week, I’m glad to say that I’m getting the necessary miles in and shaking off the cobwebs of last week.
I also booked a 5K race on the 13th of March, which should be fun. It will be my first official running race since setting off on this journey, and I’m delighted to say that the race is wholly centered around donuts, so I think I should be just fine. I’m still hoping that I will eventually find some running buddies here in Tucson, but for the moment I’m trying to get used to running on my own and motivating myself. If anybody knows of running groups down here though, let me know because I would love to get involved!
That’s pretty much all for now, but as my runs start to increase in length from here on out, I would love some advice on race nutrition. What to eat, when to eat it and how to stay fuelled throughout the 13.1 miles. I know everybody is slightly different but I don’t even know where to start and I’m sure there are some of you out there who have some experience with it all, so I’ll take any bit of advice I can get! Looking forward to the upcoming weeks and all the miles that are to come! So until next time….
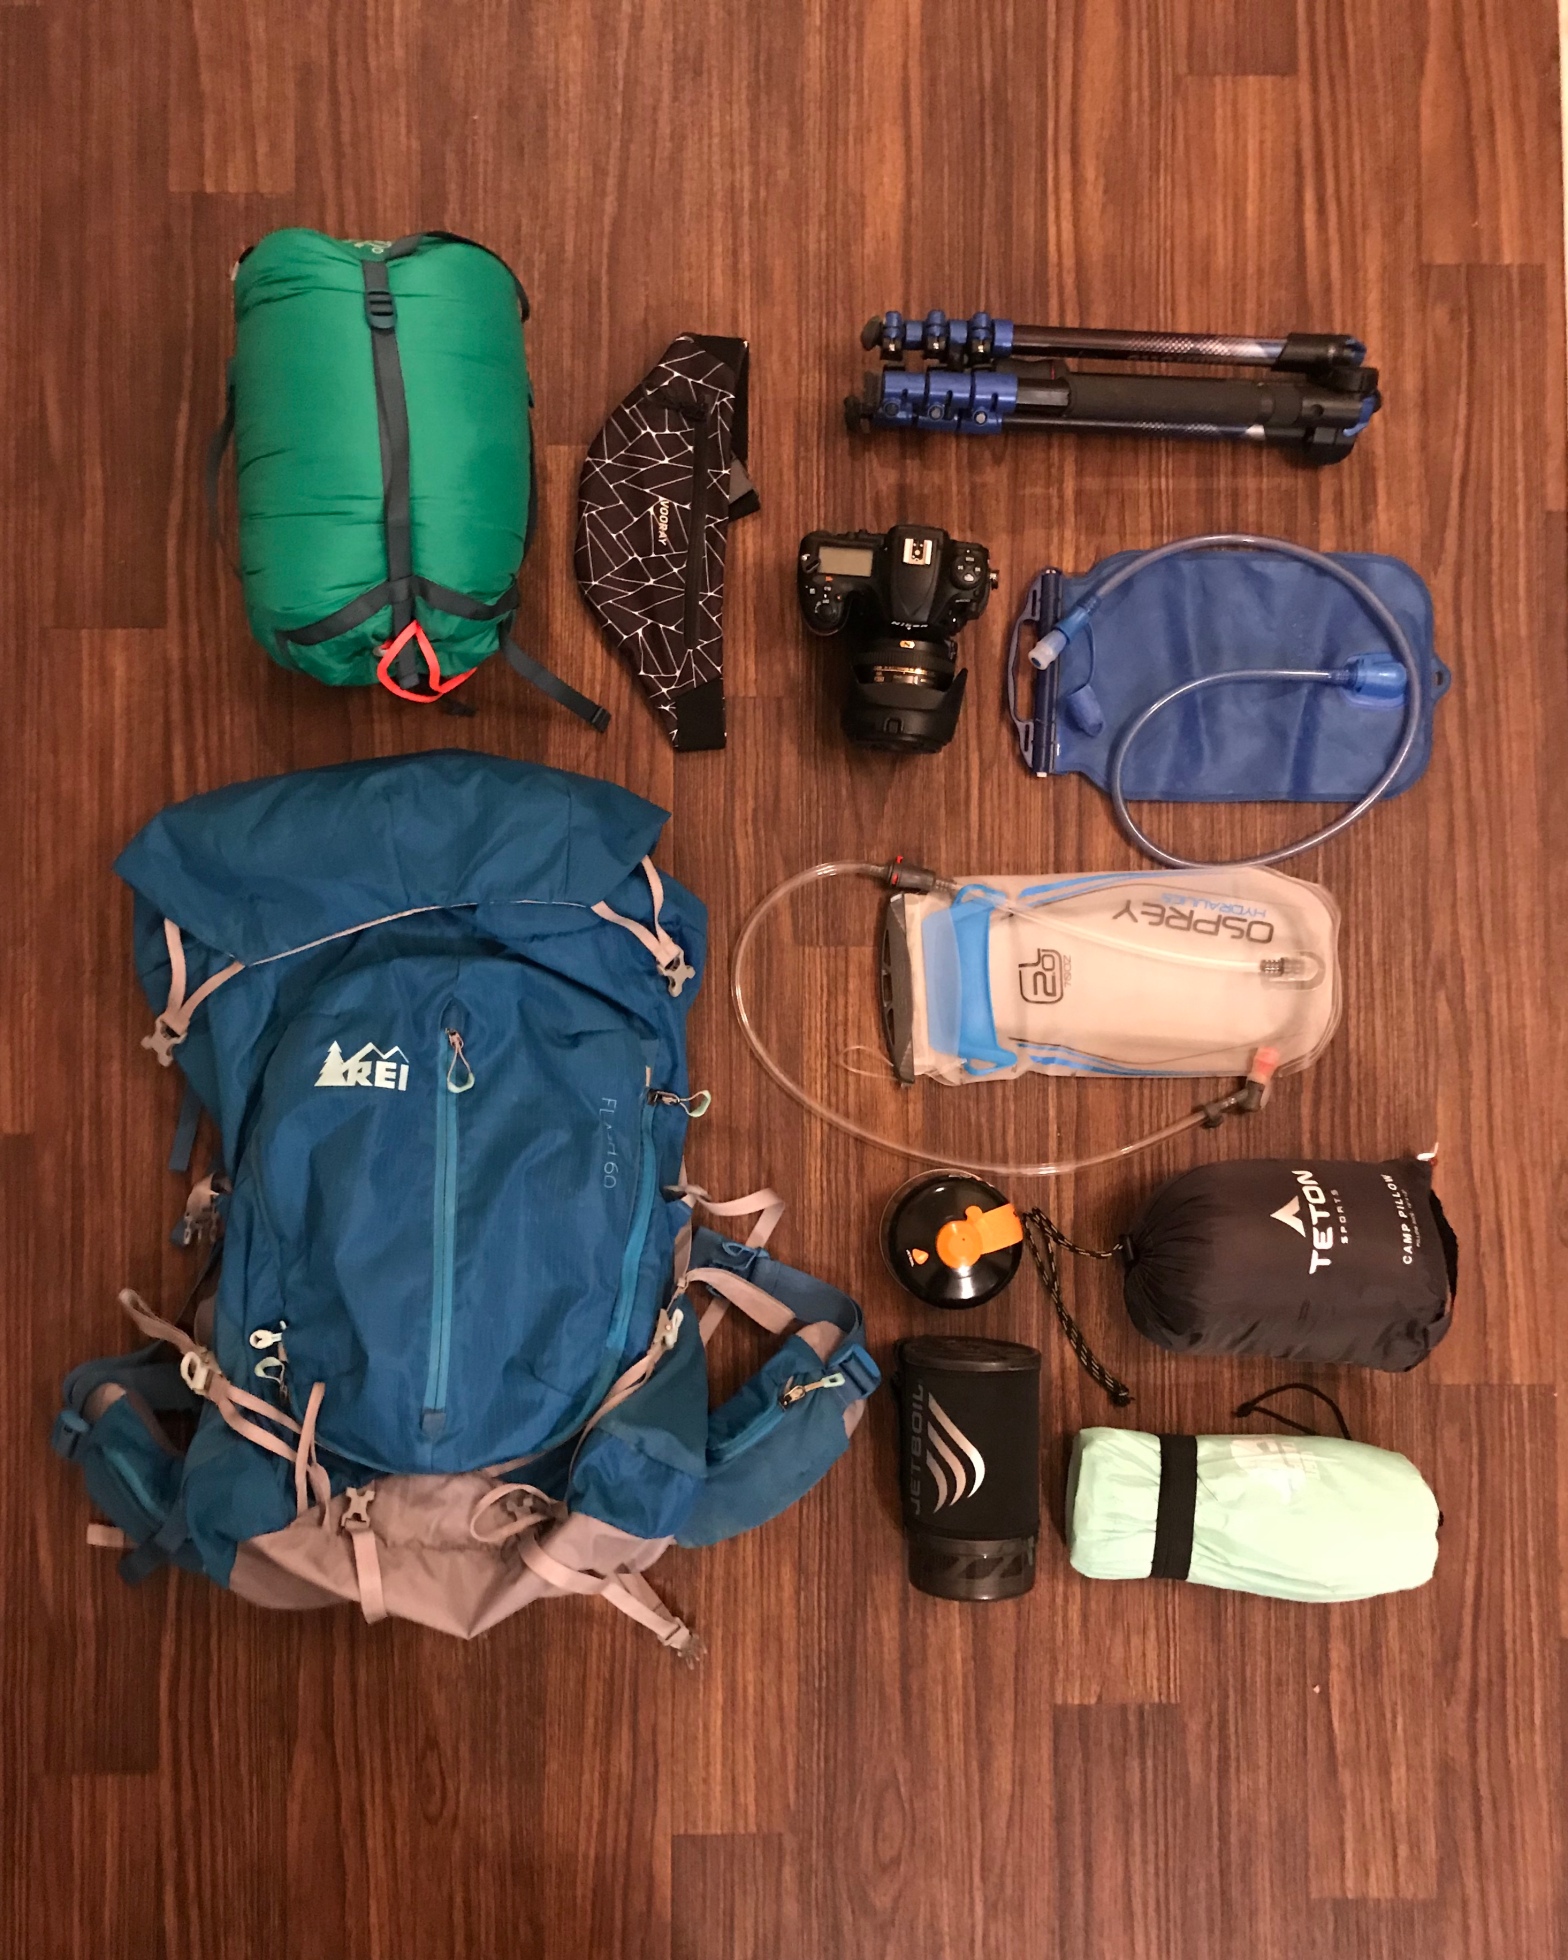
If you’re like me, and you live in a constant state of panic when it comes to packing for a trip, wondering if you brought the right things, hoping you didn’t forget anything, and praying someone else brings the things you didn’t even know you should be bringing, hopefully this list will help you the next time you go on a weekend to 3 or 4 day trip with just your backpack for company. Obviously some of this will change with personal preference and depending on the nature of your trip, but here is a list, in no particular order, of the things you will nearly always find in my backpack!
1. Headlamps – arguably one of the most important pieces of gear if you plan to do any camping or night hiking at all. I usually carry two headlamps and a spare set of batteries – just in case someone else forgets theirs or we need some extra light at the dinner table/ in the tent.
2. External Power Pack/Charging Cables – I usually carry two of these, the Brookstone 20,000mAmp and the Anker 20,000 mAmp charger, mostly because the Brookstone one has built in micro-USB and Lightening cables and the Anker is great for when that runs out, or if someone else has cables but no charger. Both can recharge my IPhone XS Max close to 5 times, so shared between my tech items, I’m not worried about losing power over a 3 day trip on anything.
3. Kids Cutlery – you can pick up camping cutlery if you want, but these can sometimes be expensive. I went to a grocery store and bought a set of kids cutlery, a knife, a fork and a spoon, and they are in my bag at all times, lightweight and small. Plus they have unicorns on them, so it’s a win win.
4. Small towel/micro fibre cloth – I use these for my camera lenses as well as drying up spills or wiping away sweat if on a particularly long hike. I always have a bandana tied around the handle of my backpack as well, which comes in handy for various uses.
5. PeakDesign camera clip – this is mostly for you photographers out there but if you hike with your camera, this is an absolute must-have accessory. Not only does it make carrying you camera easier and hands free, but you no longer have to stop and reach into your bag for access to your camera on the trails. It’s readily available at your shoulder for catching shots on the go, and can be found here.
6. Whistle – fortunately my Osprey pack has one built in, but I always bring one if I switch bags because you truly never know when you might need one – the last time we did, it was to get the dogs back after they ran after some cows. Aside from that, safety first.
7. Gloves – this may seem crazy in Arizona, but typically I will have a pair of gloves in my bag for about 6 months of the year. Aside from keeping my hands warm when we get up for sunrise shoots, or when we camp overnight in cooler temperatures, you never know when you might use them. I have previously used them to clear condensation from a car window, to set my camera down on for a shot, and to prevent scratching up my hands on particularly sharp rocks in some areas.
8. Hand sanitizer/baby wipes – don’t feel like I really need to explain this, but they’re both just great to have to stay feeling fresh!
9. Extra laces/rope, tape and a carabiner – always useful to have these just in case. You never know when you might be in a situation where you have to get resourceful, even on short day hikes!
10. Water bladder – I have a 2 litre from Osprey that I use for day hikes and a 3 litre I use for backpacking. I typically fill the bags with ice before adding water and I nearly always carry them, regardless of water sources where I’m hiking. I learnt the hard way about getting lost without water, and thankfully it was only 7 hours and overnight in the cool desert, but I’ve never gone on a hike without it since. Always. Be. Prepared.
11. Cellphone – I always used to feel like bringing my cellphone was unnecessary when I carry a camera for pictures and most of the places we go have no service. But the aforementioned time I got lost, I had chosen not to bring it, and it would’ve potentially saved me a great deal of fear sitting on a rock in the middle of the desert in the dark, alone, if I had just been able to consult the gps. Aside from doubling as a torch, a form of entertainment, a compass and a map, it’s always helpful to have a phone in case of emergency (in the times you do have service) and just to let loved ones know where you are.
12. Imodium – this may seem strange or unnecessary to some, but my biggest fear in the world is being caught outside somewhere camping in a situation where I might need Imodium 😂 they’re literally the smallest tablets, so for me, it’s a no brainier to bring them – just in case. Thankfully I haven’t had to use them yet, but I’ve certainly given them away at times to other people who have!
13. Bandana – as I mentioned before, I usually tie one to the handle on top of my day pack or backpack regardless of the trip for the same reason as the rope etc. You never know when you might need a square of fabric and bandanas have tons of uses such as a tie for a tourniquet if necessary, something to soak up blood flow in an injury, a headband (obviously), a cool neck towel if dunked in water, a clean surface to lay out food on and a napkin just to name a few.
14. My camera – I never go on any hiking trip without my camera. I shoot with a Nikon D500 which is a meaty camera with substantial weight, but with the help of my peak design camera clip and the fact that I’m just used to the weight of it now, I hardly notice it.
15. Tent and sleeping bag – I carry a 2-person Kelty tent with me unless I’m going with a group of people in which case we usually split a 2-3 person tent amongst us. I have three sleeping bags which are graded to 0 degrees (Teton heavyweight bag), 30 degrees (Marmot ultra-lightweight bag) and 60 degrees (also Marmot and ultra-lightweight). Depending on weather and if we are car camping or backpacking, I will bring the most appropriate choice/s. We recently car camped in 18 degrees and I used my 30 degree bag inside my 0 degree bag!
16. Sleeping pad – I purchased a number of thermarest sleeping pads before eventually returning them for either deflating or not being thick enough for my side sleeping and eventually purchased a $40 sleeping pad from a company called Legit Camping on Amazon (here). They have a lifetime warranty on their products and a built in pillow which is a game changer for me, as well as the fact that they come in loads of different colours! The only downside (and it really is the only one for me) is that they aren’t insulated, which means they wouldn’t be very appropriate for cold weather camping, but I have found that putting them inside my sleeping bag has proven to be pretty effective all the same!
17. Noise cancelling headphones – some campsites can be pretty noisy late at night, and I personally have a hugely irrational fear of the dark. Hearing noises outside my tent will keep me up all hours of the night, so I wear noise cancelling headphones to drown out the sounds from beyond the tent walls. If someone/something is going to get me in the middle of the night, I’d rather not know about it first!
18. Sleeping mask – mostly the same reason as above, I don’t want to see shadows and things moving around my tent, but equally, waking up with the sun isn’t always ideal, nor is waking up every time someone turns their headlamp on to pee in the middle of the night, so a silk eye mask does the trick for me!
19. Snacks – I literally am hungry all the time, so you’ll never find me without some kind of snack – sour patch kids, pop tarts or builders bar’s are the most likely contenders. I judge people hard on the snacks they bring on a hike, as good snacks a good hike make.
20. Tweezers (and a first aid kit in general) – this again might seem like kind of a weird one, but living in the desert it becomes obvious that at some point you WILL take on a cactus and lose. We were proved this during our LCR hike last year (read about it here) when Shannon fell into a particularly hairy one, but luckily we brought tweezers and were able to get as many of the hairs out as possible before the toxins really set in. The longer you leave a cactus spine in, the more it will hurt, so you’ll be glad to have these if hiking in the southwest!
Obviously there are certain things I bring specific to the areas and temperatures I often hike in, as well as things I don’t, so I definitely always advise checking the weather of the place you’re going in advance, and planning accordingly. I once stupidly and naively assumed that the desert didn’t get that cold at night, and so, in February in Sedona, I brought a 60 degree sleeping bag to camp on a night that went down below freezing. Safe to say it was close to one of the worst nights I’ve ever spent on this earth, so learn from my mistakes and do your research. Being prepared is the best way to have a fun and enjoyable experience! Is there anything you guys always bring that I missed? Or anything you think I’m crazy to bring with me all the time? I’d love to hear your thoughts! In the meantime, I hope this was useful to anyone who isn’t sure what to bring for an upcoming trip! At the end of day, getting out there is what counts, and you’ll learn soon enough through trial and error what is essential to you.