Have you ever seen pictures of the Milky Way over an epic landscape, and wondered why you can’t take photos like that yourself? Well you’re not alone, and you’re in the right place! Whether you’re wondering what equipment you will need, how to find the Milky Way at night, what settings to use or how to edit the photos you get, we’re going to cover it all! First of all though, it’s worth mentioning that the galactic core of the Milky Way (the bright cloudy part you see in all the photos) is only visible at certain parts of the year depending on where you are. In the Northern Hemisphere the galactic core is visible from around March – September.
Things to consider for Milky Way photography
There are a few things that you need to know before you go out to shoot the Milky Way, all of which we will discuss in more detail throughout the post.
- Having a camera that has the right capabilities to shoot Milky Way
- Finding somewhere dark with little to no light pollution, preferably on a night with a New Moon
- How to get the Milky Way in focus
- What settings you need to capture the Milky Way
- How to edit Milky Way photos to bring out the details
What gear do I need?
Phones
First of all, with the way technology has improved these days, you actually don’t HAVE to have a camera any more to capture the Milky Way. Below is a list of all of the camera phones that have the low light capability to shoot the Milky Way.
- Iphone 12
- Google One+ One
- Google Pixel 4
- Huawei P40 Pro
- Samsung Galaxy S20 Ultra 5G
- Xiaomi Mi Note 10
Later on in the post I will go through the best settings for capturing the Milky Way.

Camera Body
As far as cameras go, you will ideally want a camera that has manual setting capability and has changeable lenses, although this is not absolutely necessary. The Milky Way can be captured on both Crop sensor (APS-C) and Full Frame (FF) cameras, although FF is going to give you a much bigger area to capture, which is better for Milky Way landscapes. It is possible to shoot the Milky Way on some more advanced point and shoot cameras as well, as long as you can adjust the exposure length.
My recommendation when it comes to camera body would be to buy the best one you can afford, but remember that the lenses matter more than the body. I always recommend people spend their money on good quality lenses, mostly because these will last you throughout many bodies as technology improves and sensors gets better. My very first Milky Way photo was taken in 2018 on a D3400 with the 18-55mm kit lens!

Lenses
When it comes to the best lenses for Milky Way Photography, there is a common misconception that you have to have a specialized lens for astrophotography. Whilst ideally, you want to look for one with a low aperture (the f number on a lens) that will capture a lot of light, kit lenses (typically f4) are fully capable of capturing crisp Milky Way photos. The majority of cameras are sold with two kit lenses, a 24-70mm f4 and a 70-200mm f4.5-6.3, and for Milky Way landscapes you want to get as much of the landscape in as possible, so the 24-70mm all the way zoomed out at 24mm is going to be the ideal choice. If you are looking to buy an astro specific lens, I would recommend an ultra-wide angle such as the Rokinon/Samyang 14mm f2.8 or 24mm f1.4. (I use the 24mm f1.4 and love it, although I do find myself wanting something wider sometimes, in order to get the whole scene in [and more of the Milky Way Core] and will use my 14-30mm F4 with a tracker if necessary).
Tripod
A tripod is an absolute must for night photography as you will be using a long exposure which will increase the chance of motion blur if the camera is not held still. Having said this, I have been known to pull over on the side of the road on a road trip because the Milky Way has been particularly bright and used a rock or the roof of the car to prop up my camera. When I do use a tripod, I use the Peak Design Aluminium Tripod but will link a few cheaper options too.
Focus
Getting accurate focus in photography is one of the most important things you can master. There’s nothing worse than spending a whole day (or night) shooting only to get home and find out all of your photos are blurry and out of focus. With Milky Way photography this is even more important and also harder to achieve. When I ask people where they struggle with Milky Way photos, it seems pretty unanimous that focus is something that really prevents people from getting good photos. Focusing during daylight is alot easier because you have plenty of light to be able to choose your focus area and check that it is in focus before you shoot. With night photography, the surroundings are dark and it is harder to verify focus.
Personally, I use my rear LCD to focus when I’m shooting the Milky Way. I find this method the easiest and quickest for focusing and I typically take a few test shots after I have done it to double check, zooming all the way into the playback on the LCD to double check that every star is tack sharp. Below is the method I use:
- Switch focus mode to Manual (many lenses have a switch on the body of the lens as well)
- Switch to Live View on your camera
- Point your camera towards a bright star until it appears on the LCD screen and then use the digital zoom until it fills the screen
- Rotate the focus ring on the lens until the star turns from blurry to a pinpoint
- You’re all set – just be careful not to knock your focus ring if moving the camera!
- I usually turn my LCD off again as it will usually drain some of your battery


Settings
Once you have the focus set, you just have to decide on your framing and shoot away! This brings us onto our next topic, which is settings! There are three main settings to master: ISO, Aperture and Shutter Speed. Without going too deeply into camera settings, ISO controls the light sensitivity of the sensor, Aperture controls the amount of light that is let in and shutter speed controls the time that the shutter is open. For low light and night photography, you will need to let a lot of light in to make the scene visible.
ISO -I would recommend starting around ISO3200. Depending on the quality of your sensor, this should be sufficient to make the scene bright without getting too much noise. Noise is the grain that you see in your photos when they are taken in low light. Obviously the lower you can get your ISO the better, but editing software like Lightroom and Photoshop can do a pretty remarkable job of removing noise in post processing.
Aperture – Aperture (also know as the F stop) refers to the size of the opening on the lens. As discussed earlier, you ideally want a fast lens, and you want to leave that aperture wide open at F2.8 or lower. If you are working with a kit lens, you will likely only be able to get it down to around F4 and although this will increase the noise somewhat, it will certainly be sufficient to capture the Milky Way or the stars.
Shutter speed – This is the important one when it comes to Astrophotography. If your shutter speed is too short, the picture will be very dark and will not capture enough detail. If it is too long however, you will start to capture the blur of the stars as the earth rotates and you will get star trails (which is totally ok if thats the look you are going for in your photo – we will discuss that a little more later on). I find the ideal shutter speed for a 12-14mm lens to be around 10-13 secs. At 13 seconds I will typically start to see a little bit of blurring or star trailing however not enough to impact the image greatly and those extra 3 seconds leave a little more detail in the foreground.
For Phone photography, you want to set your aperture as low as possible if this is an option, and you want to make your shutter speed as long as possible. For the IPhone 12 Pro Max this is around 10-30 seconds on the night mode (You will have to have your phone on a tripod for this or at least rest it up against a rock or something sturdy).
Composition
For the most part, composition is an artistic choice, although it is recommended to follow the rule of thirds same as you would for most other landscape photography. Composing the Milky Way can be tricky depending on the time of year, as the beginning of the year in the Northern Hemisphere will find the Milkyway sitting horizontal across the sky and towards the end of the year you will find it vertical.
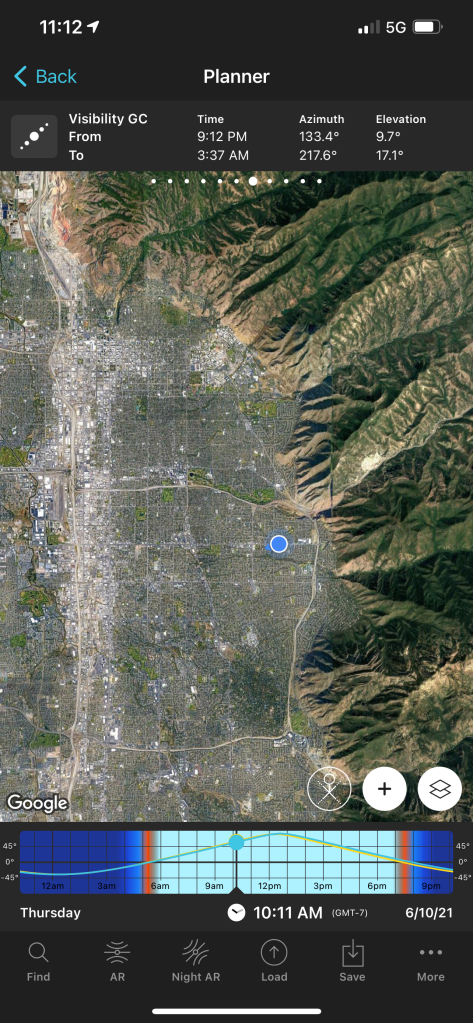
If you have a certain composition in mind, by far the easiest way to see when you would need to come back to shoot Milky Way would be to use the PhotoPills app. It is a paid app, but at $10 you get more than your money’s worth when it comes to shooting the Milky Way. The app itself can do far more than help with composition, including information about moonrise and moonset as well as phases, sunrise and sunset, when twilight hours begin and end and what time the galactic core becomes visible and its elevation in the sky. It can also help by calculating Exposure time for star trails, max exposure time to avoid star trails, and can calculate how long a timelapse would be depending on the number of photos you have and what your shooting interval is. We won’t go into too much detail in all of these (maybe I will do another post on PhotoPills alone) but all this to say, the $10 is well worth it.
The feature I use the most in PhotoPills is the Night AR. This basically allows you to hold your phone up to the composition in front of you and by swiping left and right, it will show you where the Milky Way will line up at a certain time and date. You can manually change the time and date, or just scroll until you get the composition you want. Every time I hike a new trail, I keep Milky Way in the back of my mind, and if I see a comp I’d love to line up, I check PhotoPills and see what date and time I would need to come back. I usually then screenshot the PhotoPills screen so I have a note of it if I want to reference back while planning.
This app is seriously a game changer when it comes to Milky Way and I often use it when I’m shooting in the dark as a general note of where to aim my camera. Once you have your composition set up using the app, I typically will boost my ISO up really high just to take a test shot with a shorter shutter speed and make sure everything is lined up. Just remember to put it back down to 3200 or so when you are ready to shoot.
Post-processing
So you’ve been out in the dark, you’ve set up your camera and taken your shots, and you finally made it home and can’t wait to see what you’ve got. The first thing to remember is that unless you are somewhere REALLY, REALLY dark, the Milky way is not going to be really visible in your shots straight out of the camera. Typically you will be able to see the galactic core faintly, and we’re going to take a look at how to enhance the image so that Milky Way shows up how you see it in real life. Obviously something to remember is that this part of the process is also an artistic preference. Personally I prefer a more blue tone to my Milky Way because I think it looks the most visually pleasing, but you will definitely come across some people who think it is sacrilegious to edit the Milky Way outside of its natural colour, and thats OK too. Remember that photography is just as much of an art as a science, and that the way you edit your photos is totally up to you.
When I process my images, I typically do this in Lightroom. You could also use CameraRAW, Darkroom, Photoshop or any other editing software of your choice, but I’m most familiar with Lightroom and I love that it syncs back and forth between my Iphone and my laptop, so I can pick up editing where I leave off when I’m on the go.

Import
When uploading the files into Lightroom, I always apply an ‘Import’ preset to all of my photos, which includes lens calibration and the Adobe Landscape colour profile.
Alignment
I do my best to get my horizon line straight in the camera so I usually don’t do too much editing on this front, but if you need to do this, I would start here. Once your alignment is good, we can move into the Basic Tab.
Basic Tab
I usually keep my photos in Adobe Landscape. This makes the colours a little more saturated and improves contrast. Many of my images already have a pretty cold temperature and that blue tint that I like. I sometimes reduce the temperature ever so slightly give me the bluish look I like. Sometimes it can end up a little green, so I like to increase the pink tint to bring it back to a more purpley-blue.
Next I increase the exposure slightly. Most of the darkness in your photo is going to come from the foreground in these photos, so I usually increase the Exposure a little and then use the shadows and highlights to do the rest. I increase the contrast slightly. Increasing the highlights in a photo where there is some light pollution will mostly just brighten the areas of light pollution instead of the highlights in the Milky Way itself, so I usually reduce the highlights to prevent some of the airglow, and increase the shadows to bring the foreground back from the dark. Increasing whites will create some contrast in the core, but will also bring some of that airglow we removed back in, so use sparingly. I have recently purchased John Weatherby’s ProPanel and it has some incredible time saving shortcuts for removing airglow/light pollution.
Milky Way photos are some of the only ones that I really pump up the Clarity on, and this is because it brings nice contrast into the core. I will usually also Dehaze by around 9 or 10 to again increase contrast.

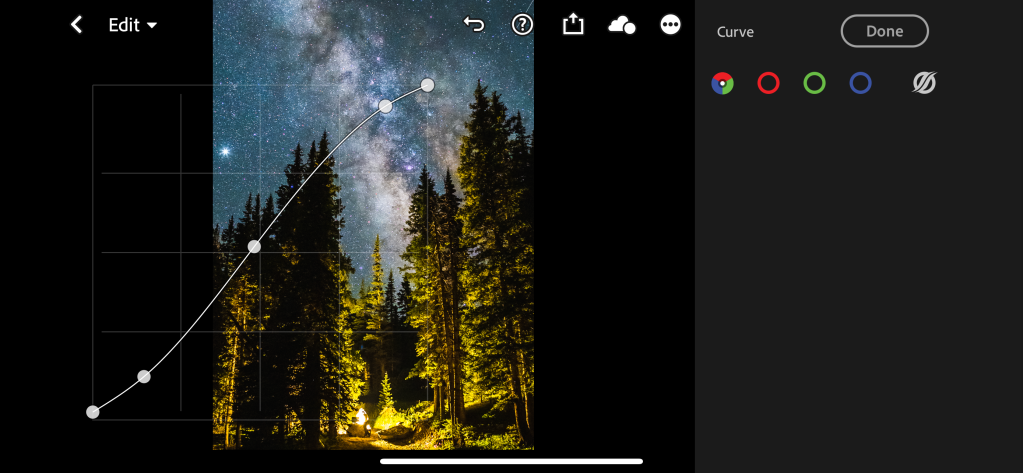
Tone Curve
I use the tone curve pretty sparingly but I do put in a slight S curve here. You can pretty much play with this to your taste, but remember the top right corner controls the highlights, the middle the midtones, and the bottom left corner – the shadows.
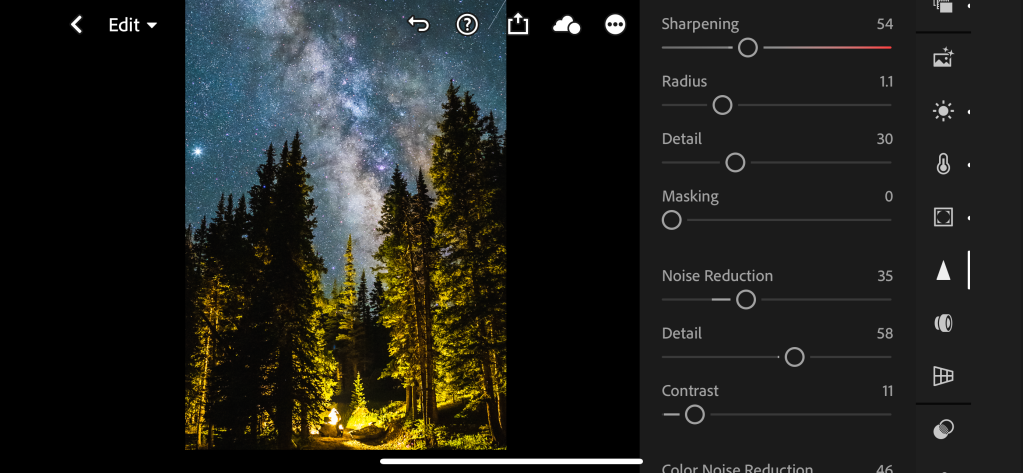
Detail
Here is where you can take care of your sharpening and/or noise reduction. How much noise reduction you need is mostly dependent on the quality of the sensor on your camera, how low (or high) your ISO was, and how well lit your foreground was. Noise reduction removes some of the graininess caused by the low light conditions in your Milky Way photos. Be aware that the more noise reduction you apply, the more detail you will lose in the photo so you will need to find the right balance between the two.
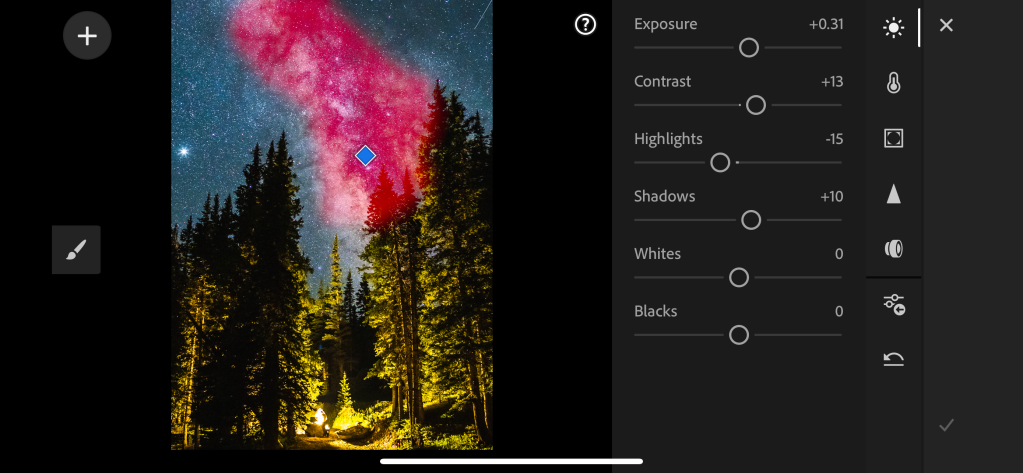
Masks/Filters
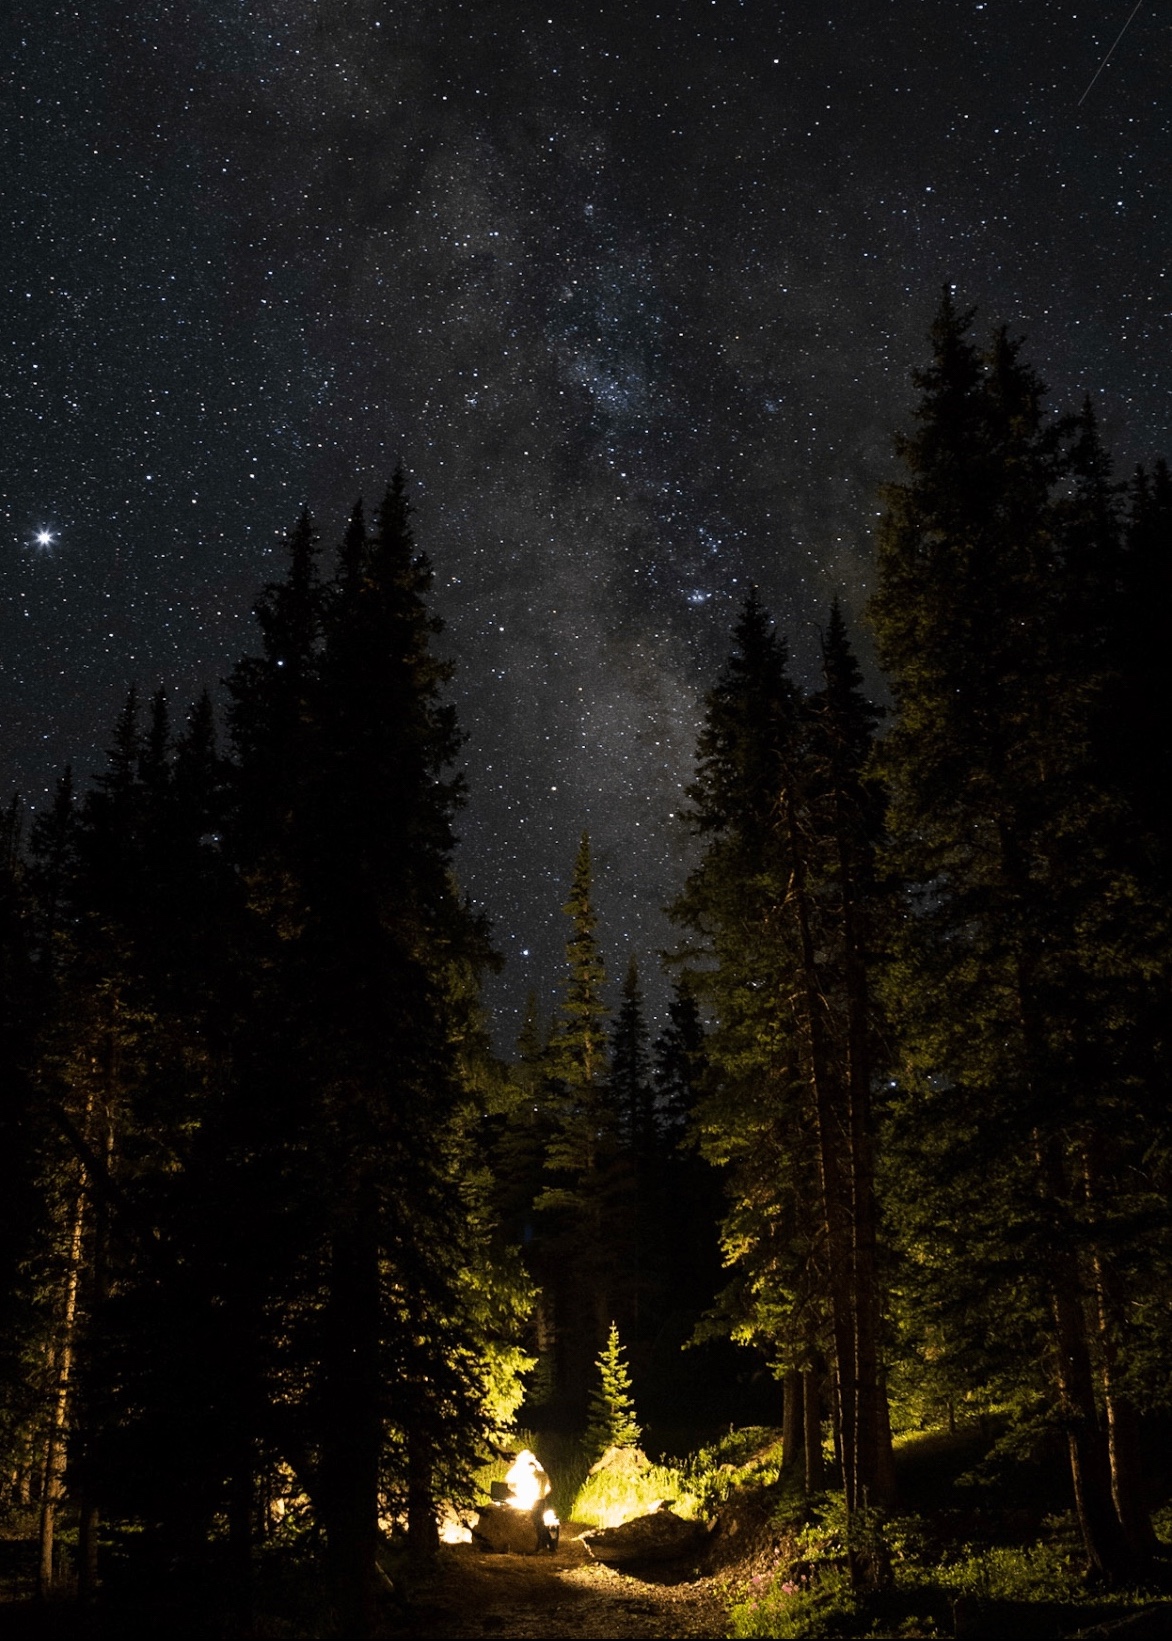
I use both gradiented and selective filters in many of my Milky Way Photos to enhance the contrast and bring out the details of the Milky Way. I am definitely still learning ways to do this, but I mostly use a gradiented filter to darken the sky again once I have brightened the foreground and selective filters to increase clarity, dehaze and increase whites back into the sky. In this particular shot I used a selective filter to brighten the milky way without blowing out the highlights from the lamp.
Trackers
Star trackers allow you to use long exposures without getting star trails. Essentially the tracker will move in harmony with the rotation of the earth so that the stars do not get blurred. There are a few different options when it comes to star trackers, including battery powered and chronological ones, and I personally went with the mechanical version so I don’t have to plug anything in or worry about it running out of power on a long night. The iOptron SkyTracker is what I ended up getting (thanks mum and dad for the birthday present!). Something to consider with trackers is whether you want to shoot Milky Way landscapes, as this will require a composite photo where you take an evenly exposed photo of the foreground and blend it with a long exposure photo of the Milky Way.
Overall, shooting the Milky Way takes a bit of practice, but there is no reason you cant go out on the next New Moon and bag yourself a shot. If there’s anything else you’d like to know, or anything I missed, please leave a comment below and I will answer them all!
Until then, happy shooting!
H x

Super helpful!
LikeLike